6.3. Modbus - Adding a Device to EdgeX
EdgeX - Fuji Release
PowerScout 3037 Power Submeter
https://shop.dentinstruments.com/products/powerscout-3037-ps3037 https://www.dentinstruments.com/hs-fs/hub/472997/file-2378482732-pdf/Pdf_Files/PS3037_Manual.pdf

In this example, we use a simulator instead of a real device to allow us to test our device-modbus features.
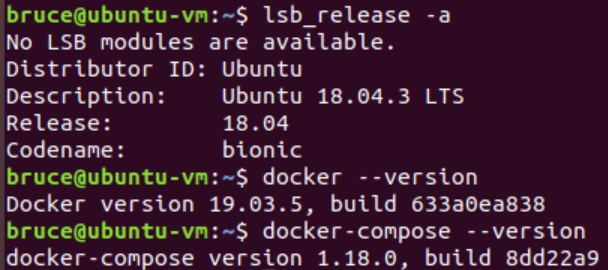
6.3.1. Environment
You can use any operating system that can install docker and docker-compose. In this example, we use Ubuntu18 to deploy EdgeX using docker. The system requirements can be found at https://docs.edgexfoundry.org/Ch-GettingStartedUsers.html#what-you-need.
6.3.2. Run a ModbusPal (Modbus Device Simulator)
1.Download ModbusPal from https://sourceforge.net/p/modbuspal/discussion/899955/thread/72cf35ee/cd1f/attachment/ModbusPal.jar .
2.Install required lib:
sudo apt install librxtx-java
3.Startup the ModbusPal:
sudo java -jar ModbusPal.jar
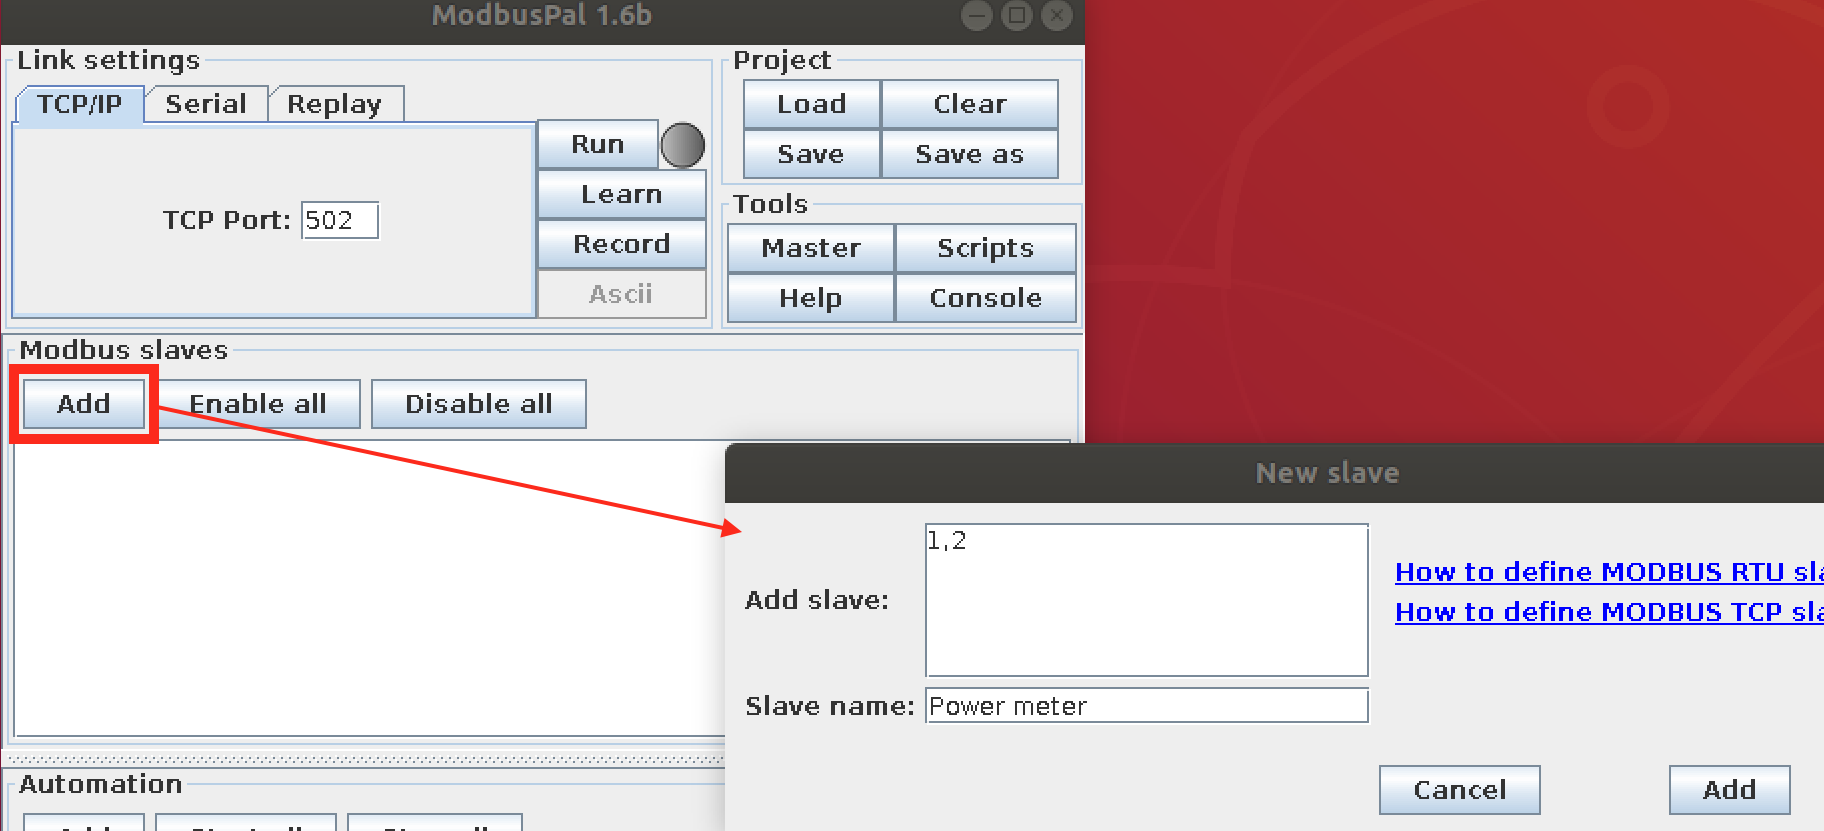
6.3.3. Setup ModbusPal
To simulate sensors, such as temperature and humidity, do the following or load the predefined setting( EdgeX_ExamplesModbus_SimulationPowerMeter.xmpp):
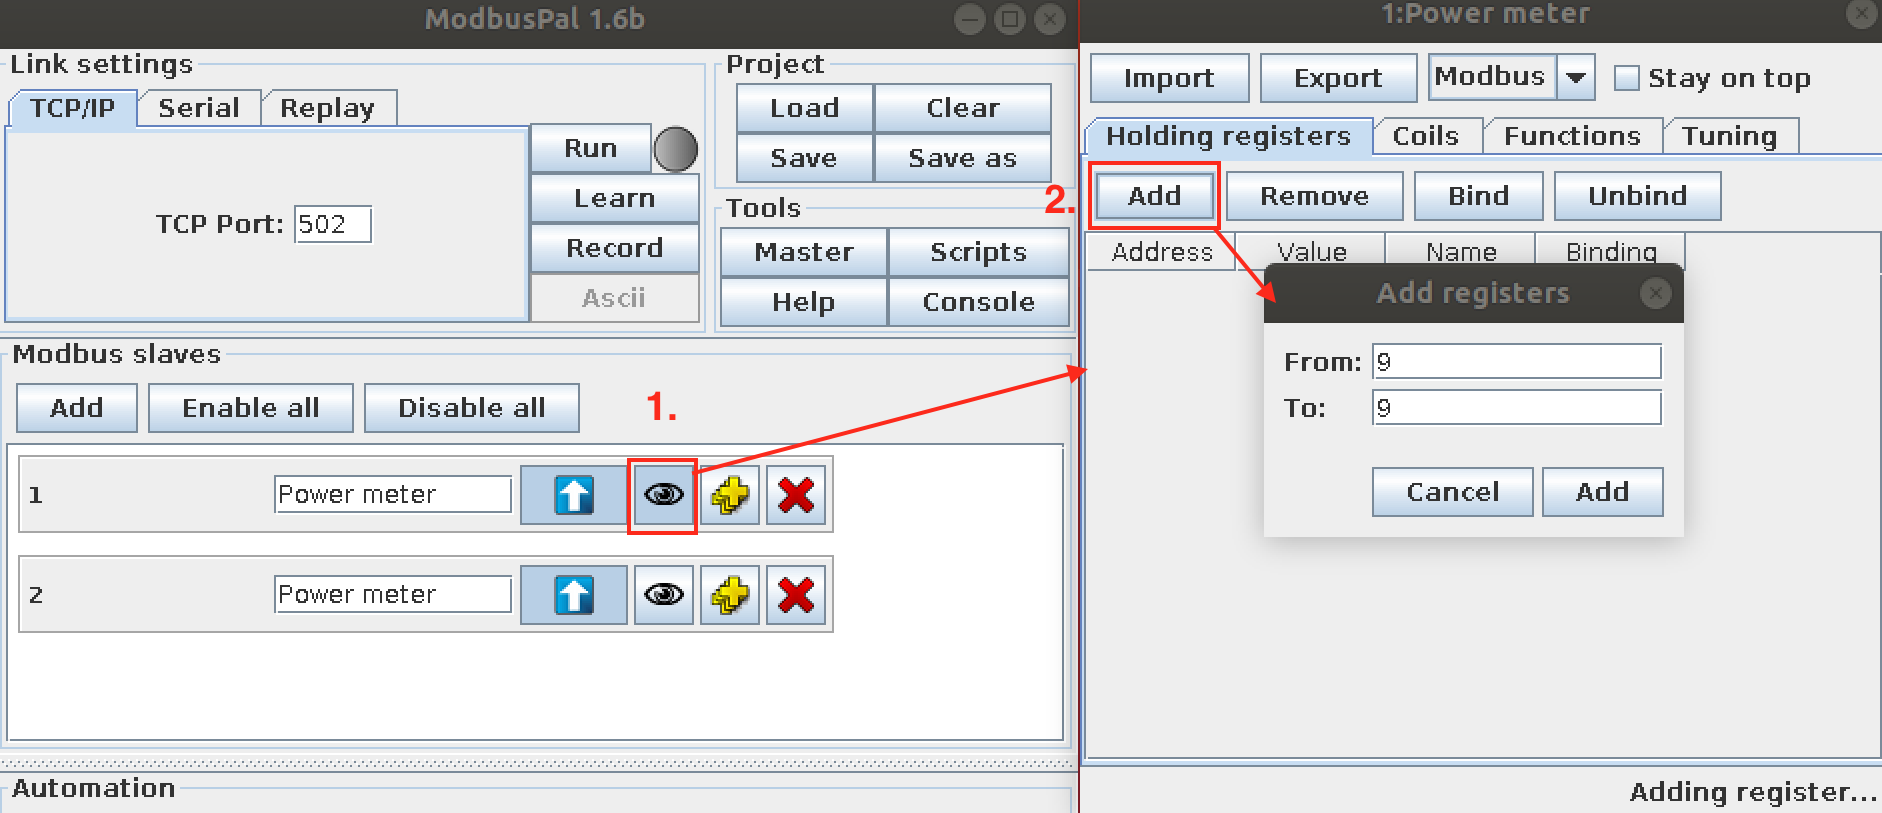
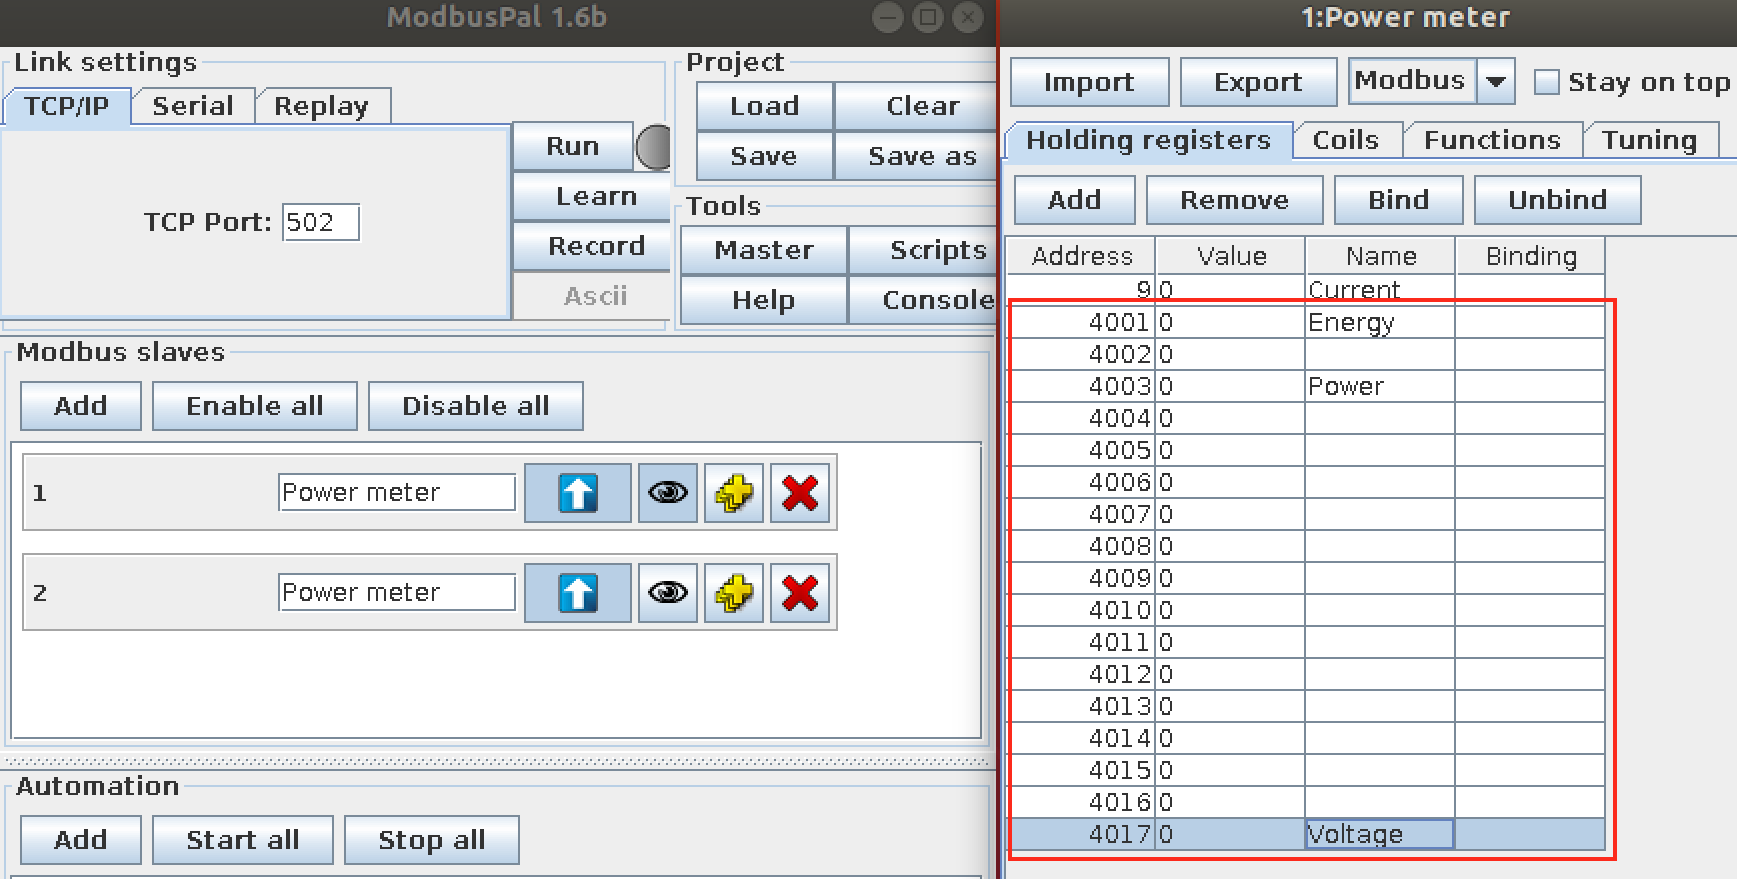
6.3.3.2. Add registers
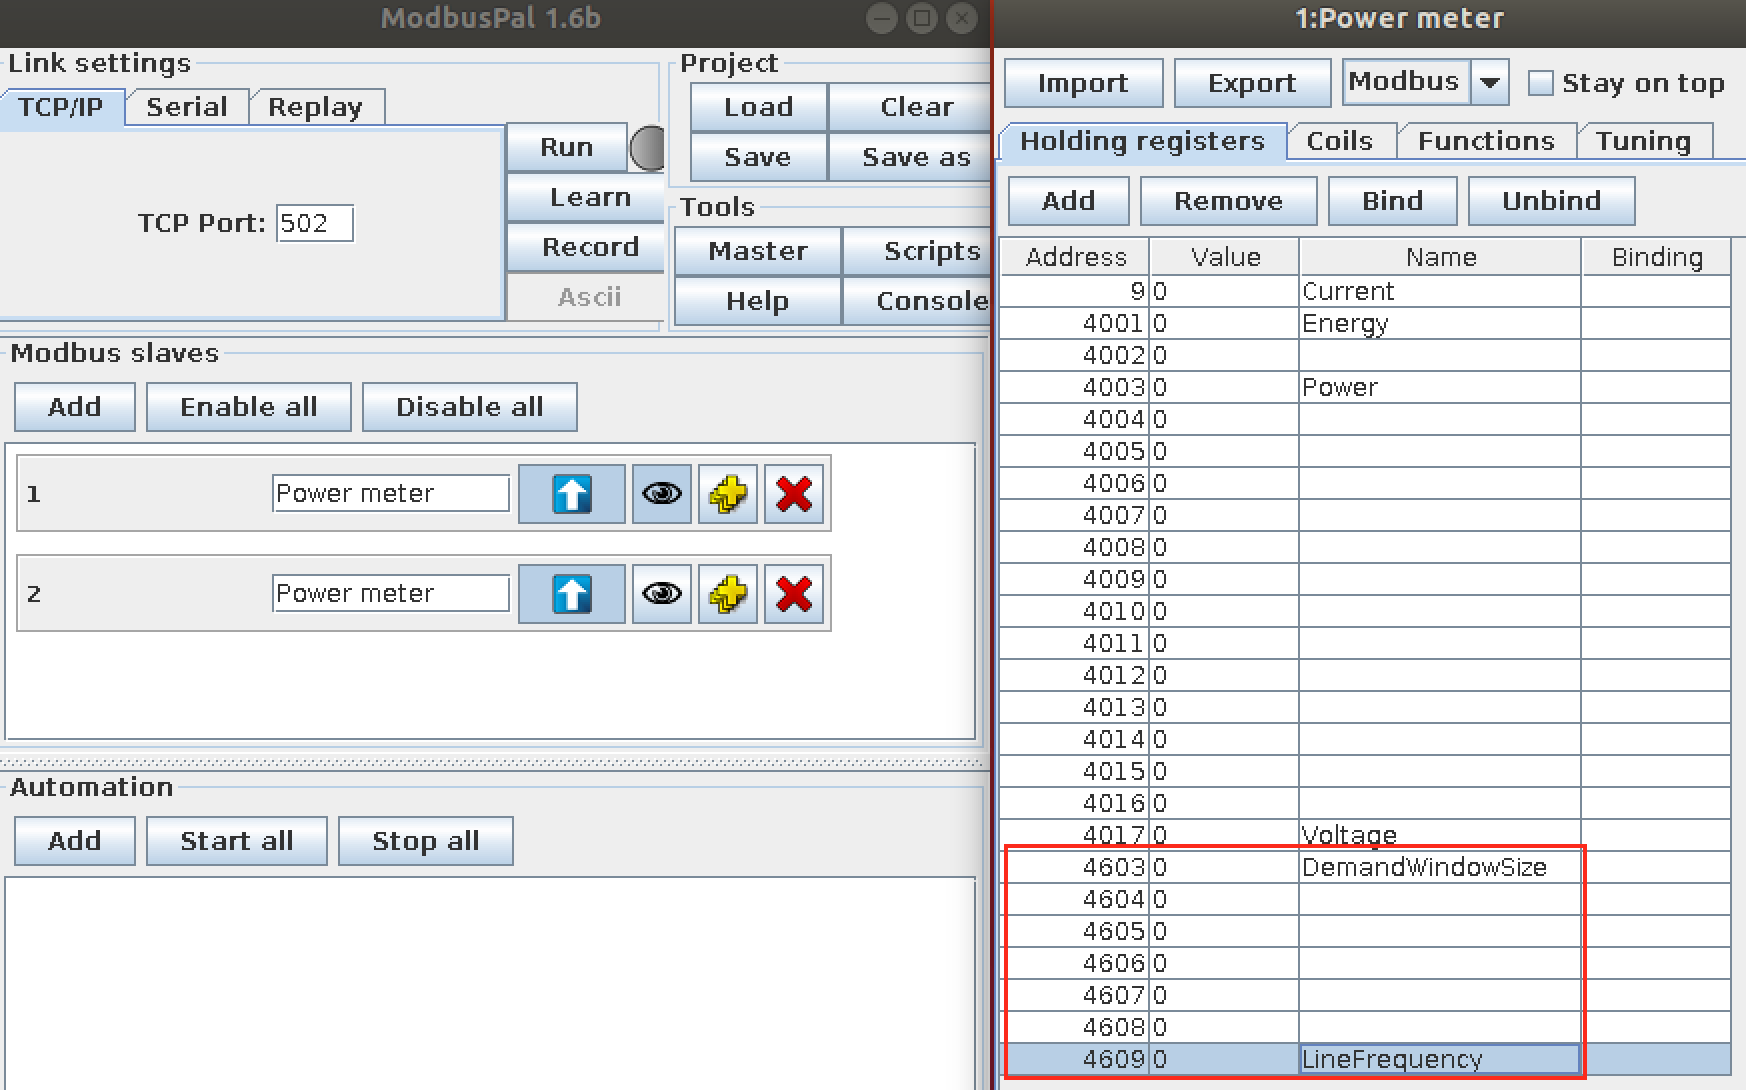
- Add register for Current
- Add registers for Energy, Power, and Voltage.
- Add registers for DemandWindowSize and LineFrequency.
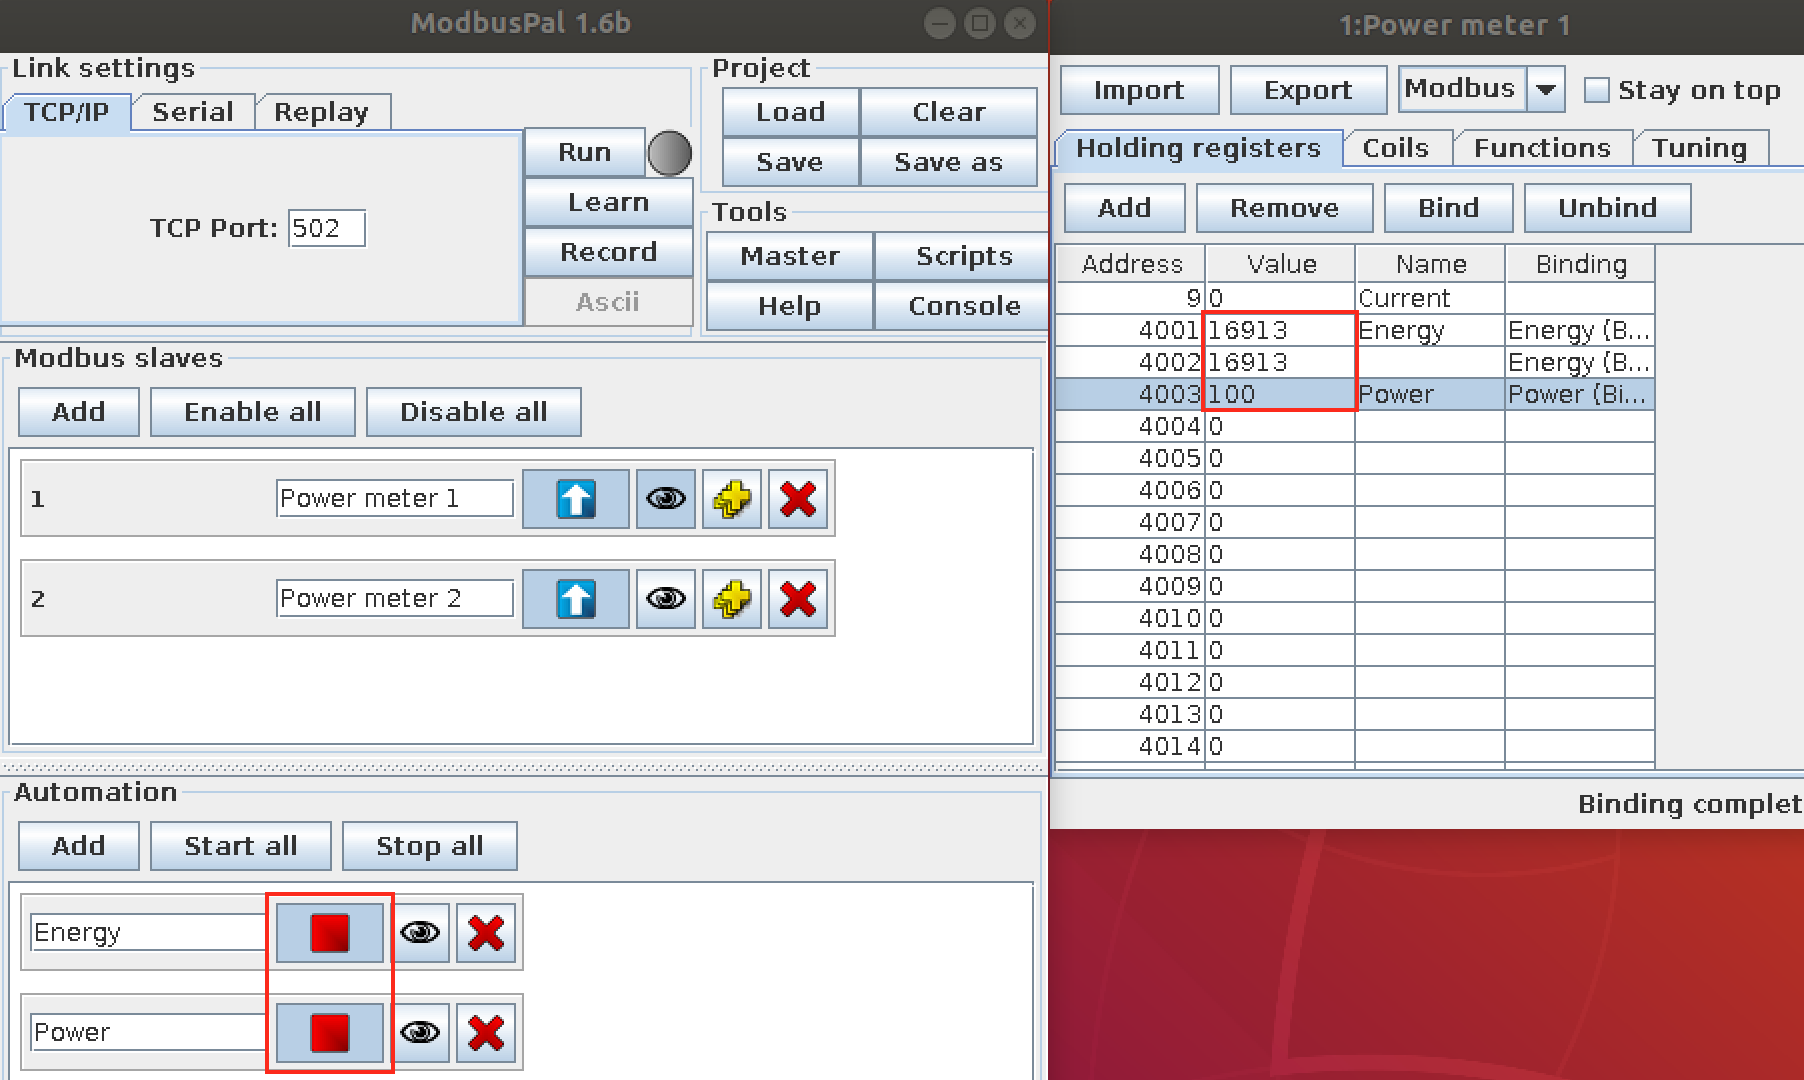
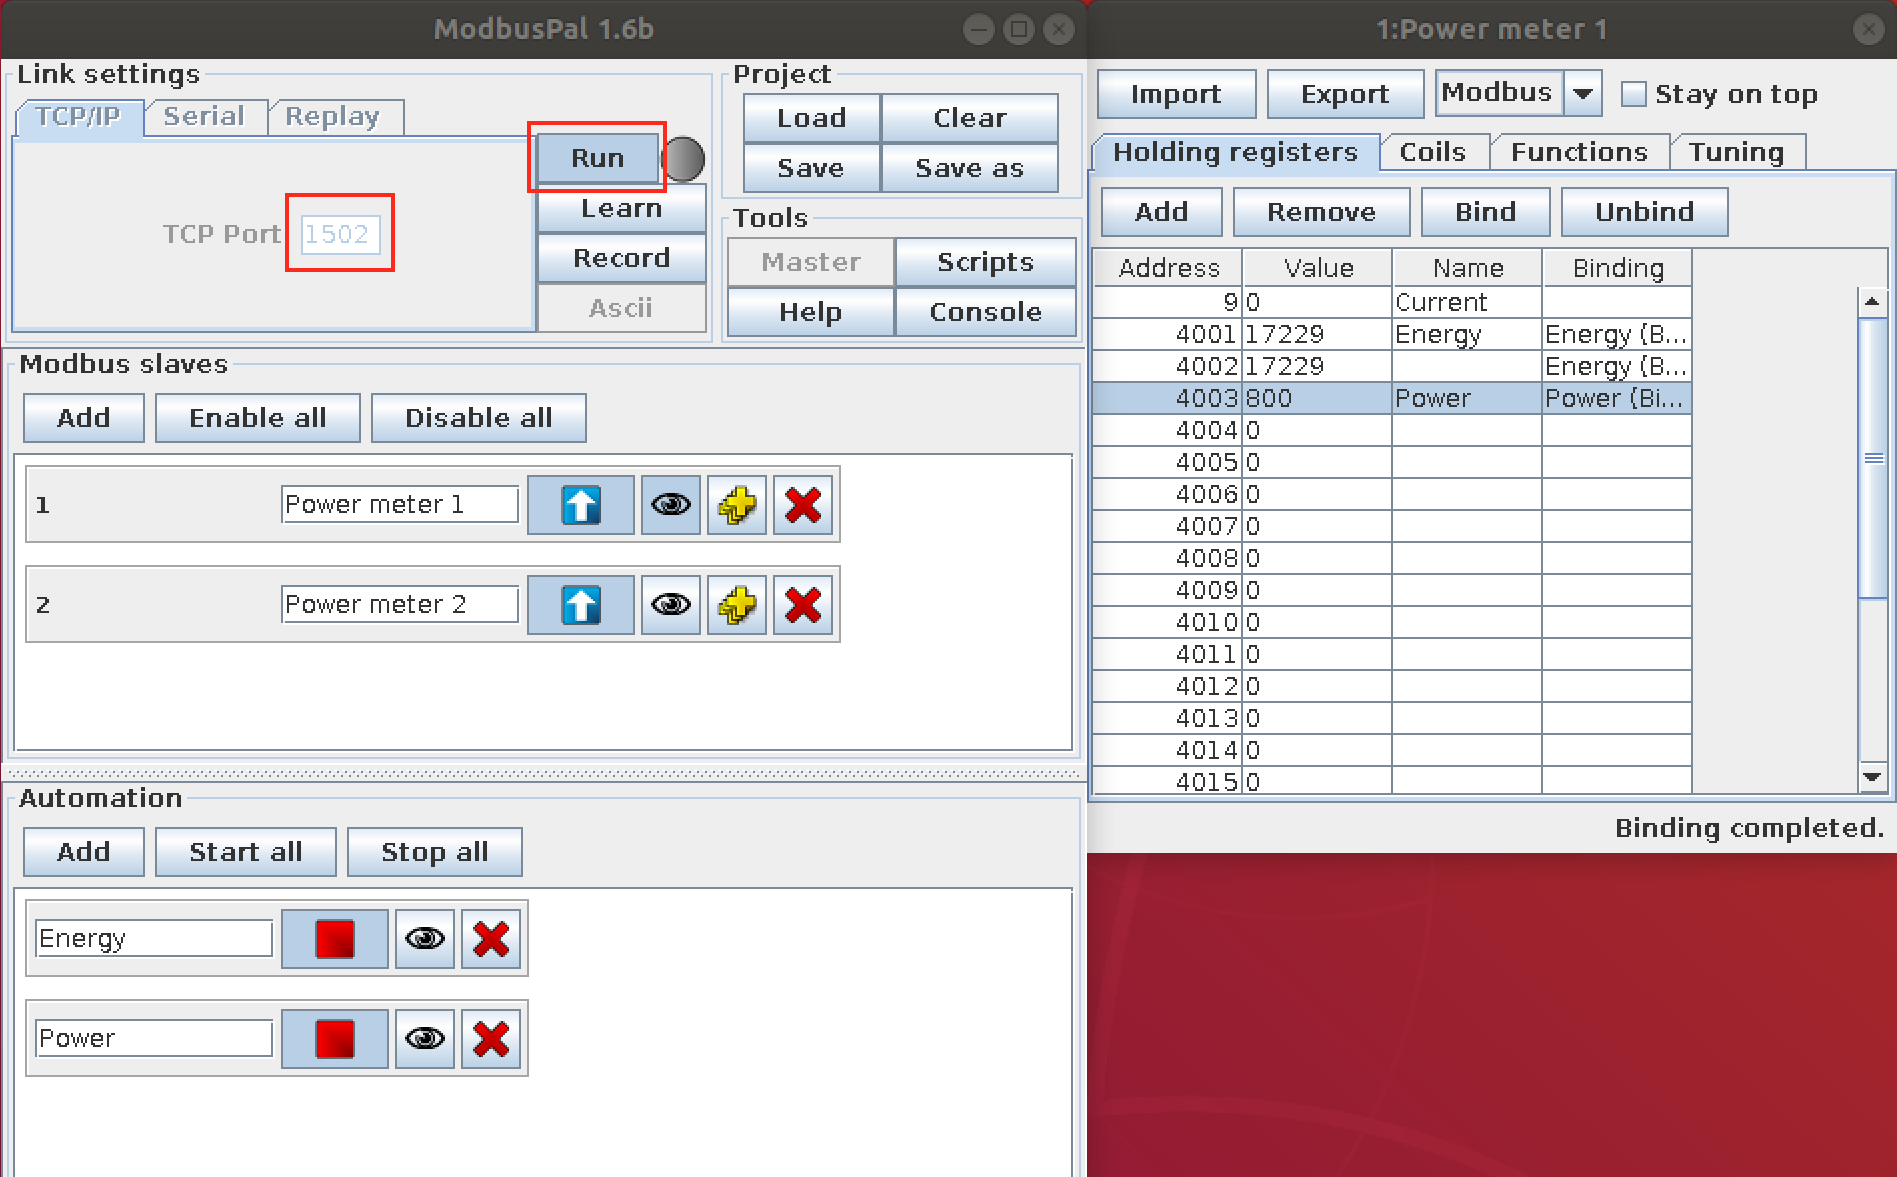
6.3.3.3. Mock the device reading value
- Add the modbuspal support value auto-generator, which can bind to registers:
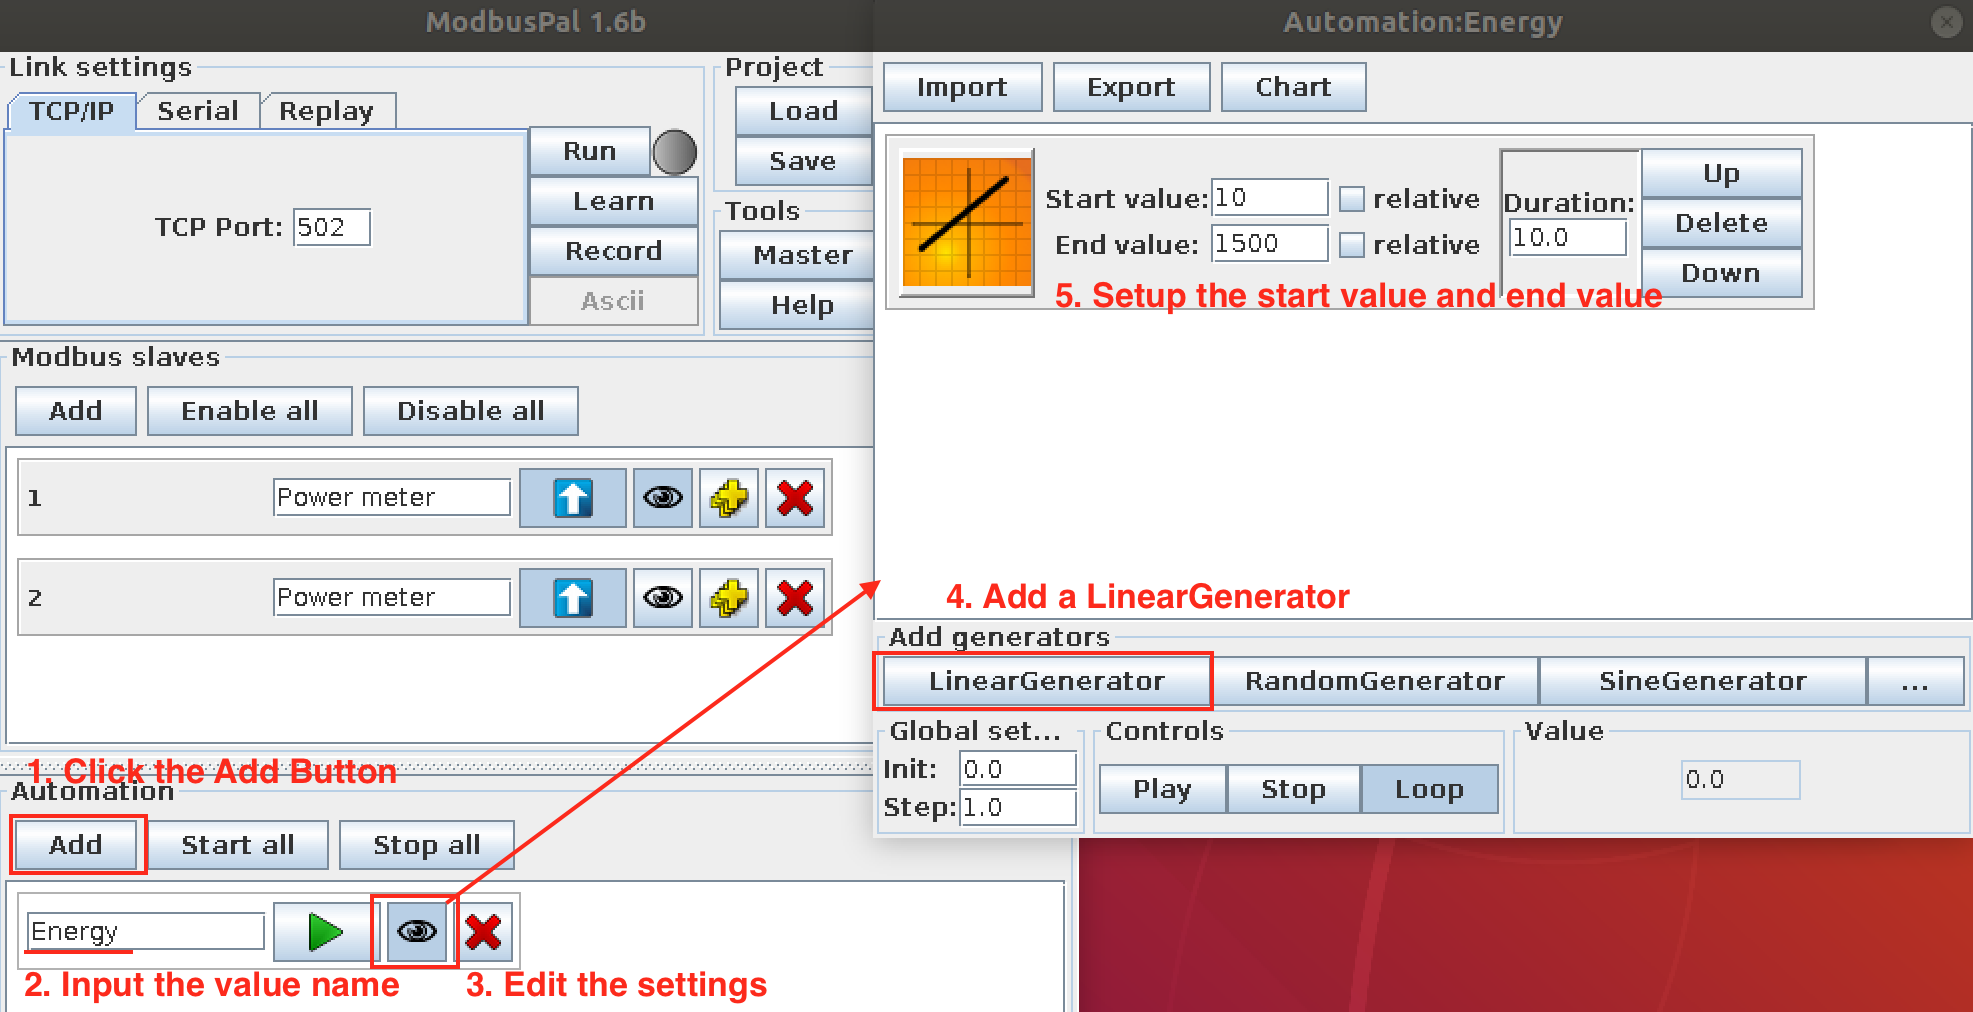
Repeat the steps above to add more value generators.
- Bind the value generator to the register
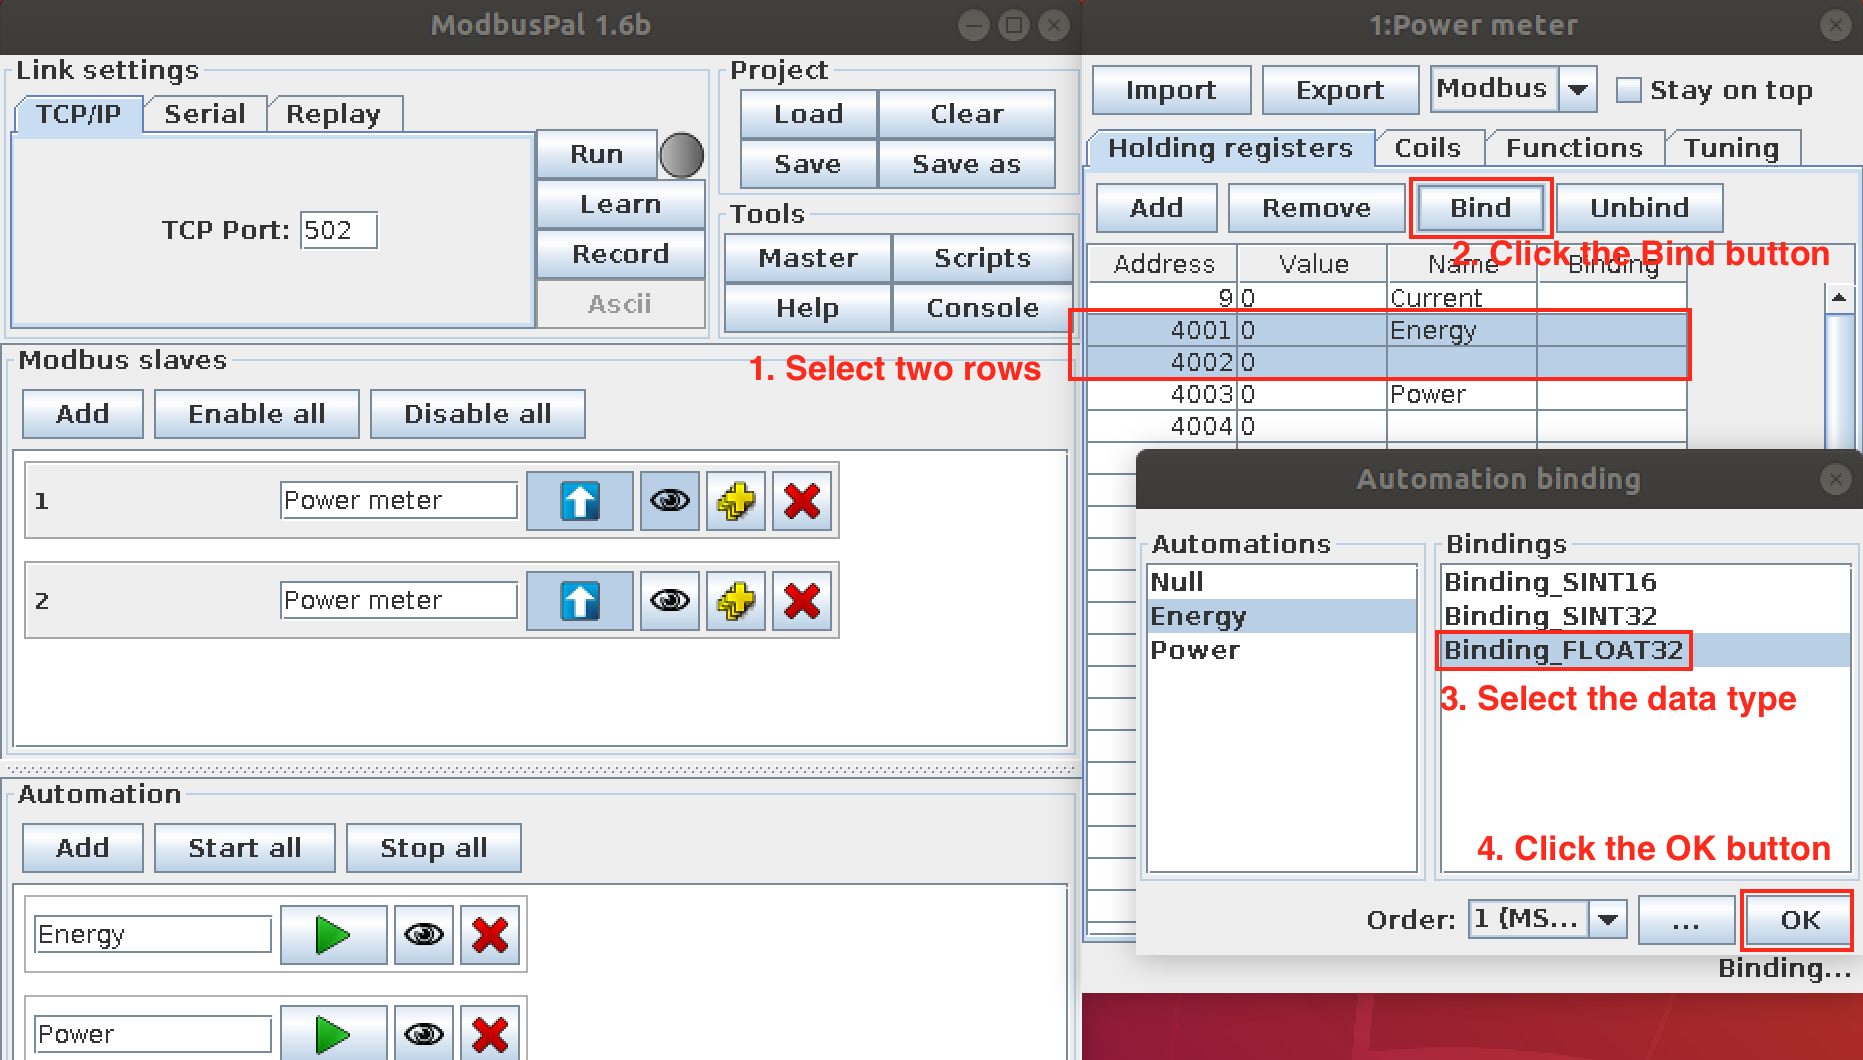
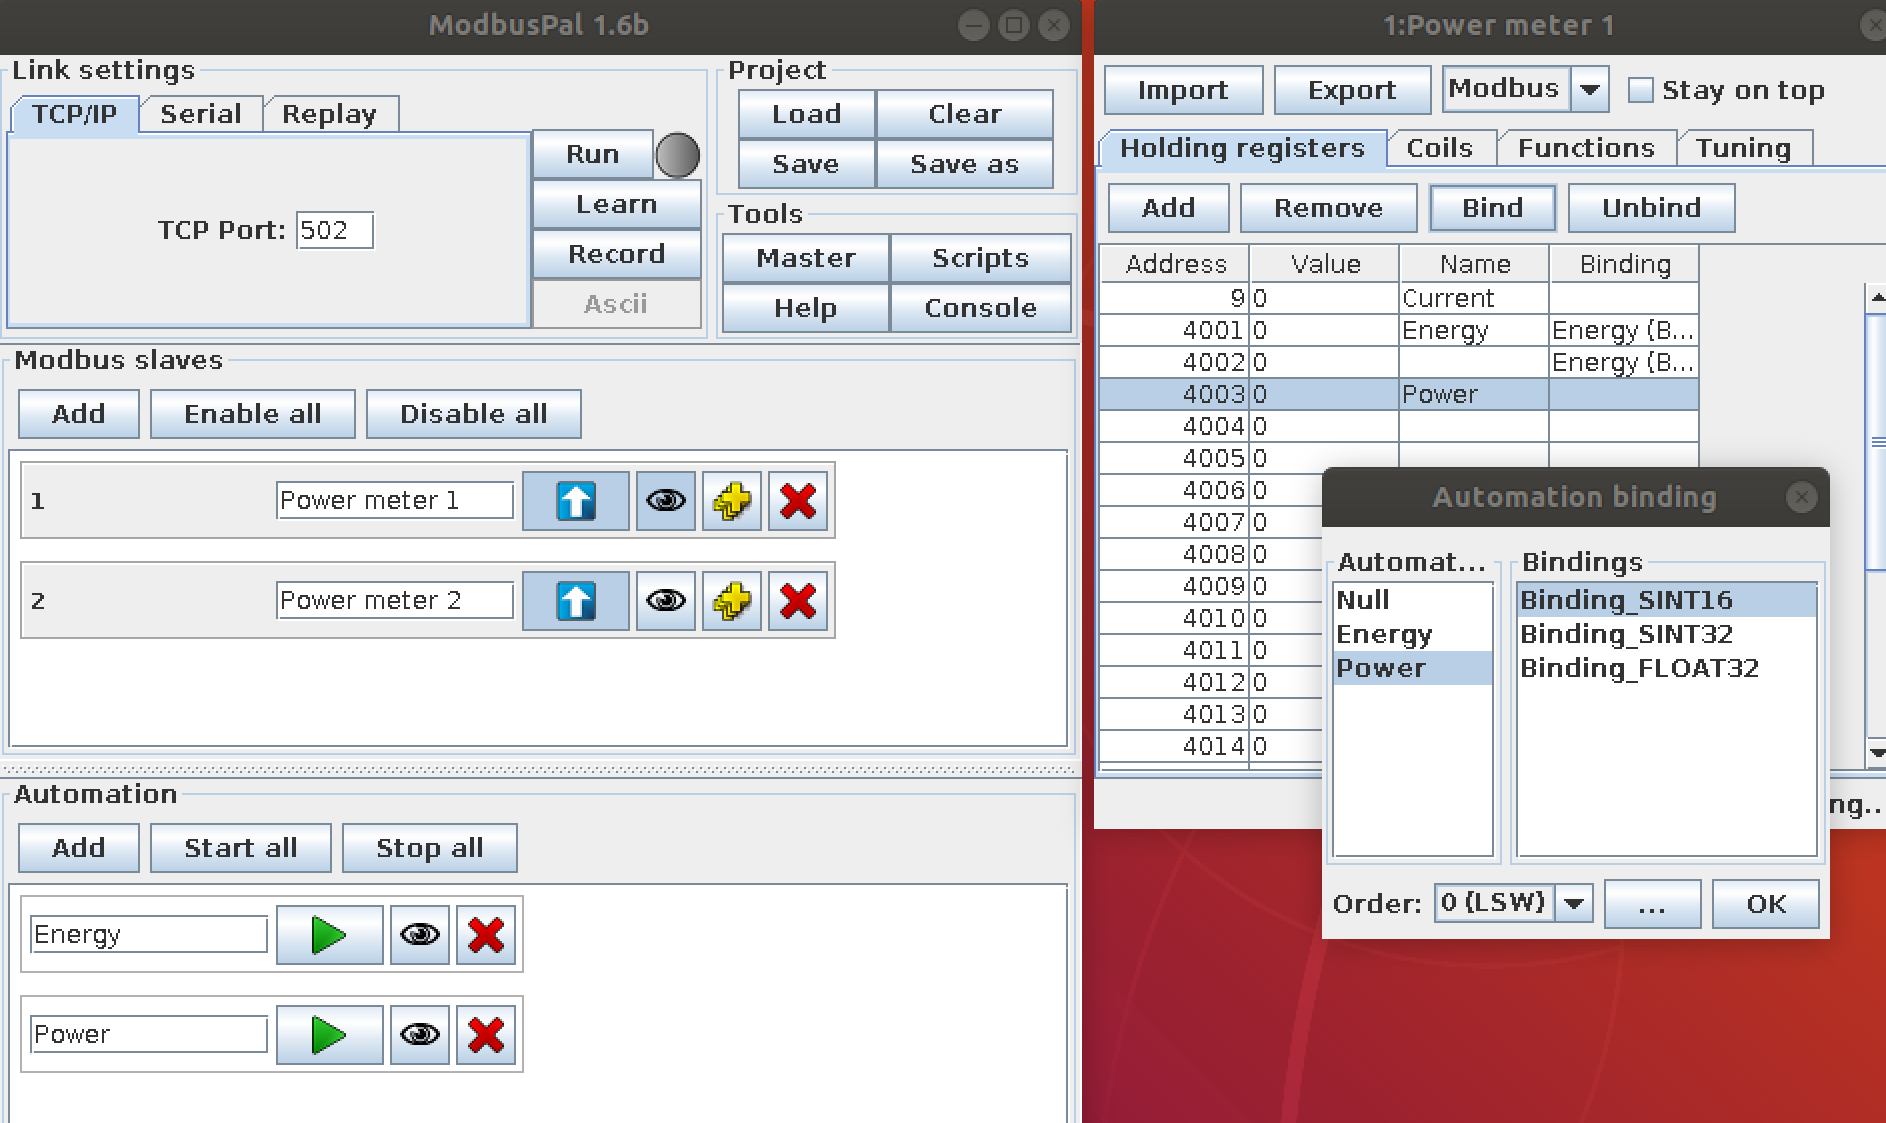
Repeat the steps above to bind the value generator to the register.
- Start the value generator
6.3.4. Setup
In this section, we create a folder that contains the files required for deployment:
- device-service-demo
  |- docker-compose.yml
  |- modbus
     |- configuration.toml
     |- DENT.Mod.PS6037.profile.yaml
If you prefer to start the services and then add the device, see Alternative Set-up
6.3.4.1. Device Profile
The DeviceProfile defines the device’s values and operation method, which can be Read or Write.
You can download and use the provided DENT.Mod.PS6037.profile.yaml .
In the Modbus protocol, we must define attributes:
primaryTable: HOLDING_REGISTERS, INPUT_REGISTERS, COILS, DISCRETES_INPUTstartingAddressspecifies the address in Modbus device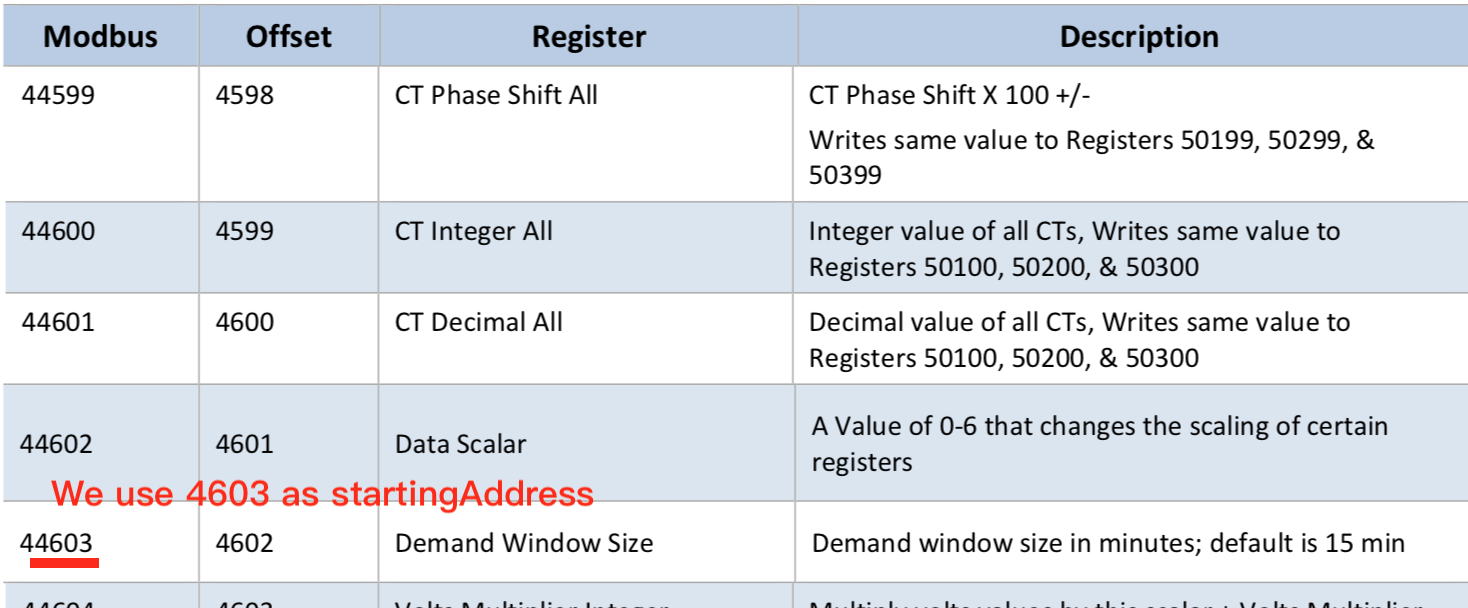
The Property value type decides how many registers will be read. Like Holding registers, a register has 16 bits. If the device manual specifies that a value has two registers, define it as FLOAT32 or INT32 or UINT32 in the deviceProfile.
Once we execute a command, device-modbus knows its value type and register type, startingAddress, and register length. So it can read or write value using the modbus protocol.

Create the device profile, as shown below:
# DENT.Mod.PS6037.profile.yaml
name: "Network Power Meter"
manufacturer: "Dent Instruments"
model: "PS3037"
description: "Power Scout Meter"
labels:
  - "modbus"
  - "powerscout"
deviceResources:
    -
        name: "DemandWindowSize"
        description: "Demand window size in minutes; default is 15 min"
        attributes:
            { primaryTable: "HOLDING_REGISTERS", startingAddress: "4603" }
        properties:
            value:
                { type: "UINT16", readWrite: "R", size: "1", scale: "1", minimum: "0", maximum: "65535", defaultValue: "0"}
            units:
                { type: "String", readWrite: "R", defaultValue: "min"}
    -
        name: "LineFrequency"
        description: "Line frequency setting for metering: 50=50 Hz, 60=60Hz"
        attributes:
            { primaryTable: "HOLDING_REGISTERS", startingAddress: "4609" }
        properties:
            value:
                { type: "UINT16", readWrite: "R", size: "1", scale: "1", minimum: "0", maximum: "65535", defaultValue: "0"}
            units:
                { type: "String", readWrite: "R", defaultValue: "Hz"}
deviceCommands:
    -
        name: "Configuration"
        set:
            - { index: "1", operation: "set", deviceResource: "DemandWindowSize" }
            - { index: "2", operation: "set", deviceResource: "LineFrequency" }
        get:
            - { index: "1", operation: "get", deviceResource: "DemandWindowSize" }
            - { index: "2", operation: "get", deviceResource: "LineFrequency" }
coreCommands:
    -
        name: "Configuration"
        get:
            path: "/api/v1/device/{deviceId}/Configuration"
            responses:
                -
                    code: "200"
                    description: "Get the Configuration"
                    expectedValues: ["DemandWindowSize","LineFrequency"]
                -
                    code: "500"
                    description: "internal server error"
                    expectedValues: []
        put:
            path: "/api/v1/device/{deviceId}/Configuration"
            parameterNames: ["DemandWindowSize","LineFrequency"]
            responses:
                -
                    code: "204"
                    description: "Set the Configuration"
                    expectedValues: []
                -
                    code: "500"
                    description: "internal server error"
                    expectedValues: []
6.3.4.2. Device Service Configuration
We define devices and schedule job (auto events) in the TOML configuration file, and then device-modbus creates the corresponding instances on startup.
- device-modbus offers two types of protocol, Modbus TCP and Modbus RTU, which can be defined as shown below:
Modbus Protocols¶ protocol Address Port UnitID BaudRate DataBits StopBits Parity modbus-tcp 172.17.0.1 1502 1 modbus-rtu /dev/ttyUSB0 2 19200 8 1 N
In the RTU protocol, parity (N - None, O - Odd, E - Even, default is E).
Create the configuration file, as shown below:
[Service]
Host = "edgex-device-modbus"
Port = 49991
ConnectRetries = 3
Labels = []
OpenMsg = "device modbus started"
Timeout = 5000
EnableAsyncReadings = true
AsyncBufferSize = 16

[Registry]
Host = "edgex-core-consul"
Port = 8500
CheckInterval = "10s"
FailLimit = 3
FailWaitTime = 10
Type = "consul"

[Logging]
EnableRemote = true
File = "./device-Modbus.log"

[Writable]
LogLevel = "INFO"

[Clients]
  [Clients.Data]
  Name = "edgex-core-data"
  Protocol = "http"
  Host = "edgex-core-data"
  Port = 48080
  Timeout = 50000

  [Clients.Metadata]
  Name = "edgex-core-metadata"
  Protocol = "http"
  Host = "edgex-core-metadata"
  Port = 48081
  Timeout = 50000

  [Clients.Logging]
  Name = "edgex-support-logging"
  Protocol = "http"
  Host = "edgex-support-logging"
  Port = 48061

[Device]
  DataTransform = true
  InitCmd = ""
  InitCmdArgs = ""
  MaxCmdOps = 128
  MaxCmdValueLen = 256
  RemoveCmd = ""
  RemoveCmdArgs = ""
  ProfilesDir = "/custom-config"

# Pre-define Devices
[[DeviceList]]
  Name = "Modbus-TCP-Device"
  Profile = "Network Power Meter"
  Description = "This device is a product for monitoring and controlling digital inputs and outputs over a LAN."
  labels = [ "Air conditioner","modbus TCP" ]
  [DeviceList.Protocols]
    [DeviceList.Protocols.modbus-tcp]
       Address = "172.17.0.1"
       Port = "1502"
       UnitID = "1"
Note that ProfilesDir points to “/custom-config”, so the Device Service loads the device profile YAML files from this folder.
Also, the first character of protocol properties should be uppercase.
- Address
- Port
- BaudRate
- DataBits
- StopBits
- Parity
- UnitID
Here’s the example for Modbus RTU: https://github.com/edgexfoundry/device-modbus-go/blob/master/cmd/res/example/configuration.toml#L73
6.3.4.3. Add Device Service to docker-compose File
Download the docker-compose file from https://github.com/edgexfoundry/developer-scripts/blob/master/releases/fuji/compose-files/docker-compose-fuji-1.1.0.yml.
Because we deploy EdgeX using docker-compose, we must add device-modbus to the docker-compose file. If you have prepared configuration files, you can mount them using volumes and change the entrypoint for device-modbus internal use.
This is illustrated in the following docker-compose file snippet:
device-modbus:
  image: edgexfoundry/docker-device-modbus-go:1.1.0
  ports:
    - "49991:49991"
  container_name: edgex-device-modbus
  hostname: edgex-device-modbus
  networks:
    - edgex-network
  volumes:
    - db-data:/data/db
    - log-data:/edgex/logs
    - consul-config:/consul/config
    - consul-data:/consul/data
    - ./modbus:/custom-config
  depends_on:
    - data
    - command
  entrypoint:
    - /device-modbus
    - --registry=consul://edgex-core-consul:8500
    - --confdir=/custom-config
When using Device Services, users have to provide the registry URL in –registry argument.
6.3.5. Start EdgeX Foundry on Docker
Once the following folder has been populated, we can deploy EdgeX:
- device-service-demo
  |- docker-compose.yml
  |- modbus
     |- configuration.toml
     |- DENT.Mod.PS6037.profile.yaml
Deploy EdgeX using the following commands:
$ cd path/to/device-service-demo
$ docker-compose pull
$ docker-compose up -d
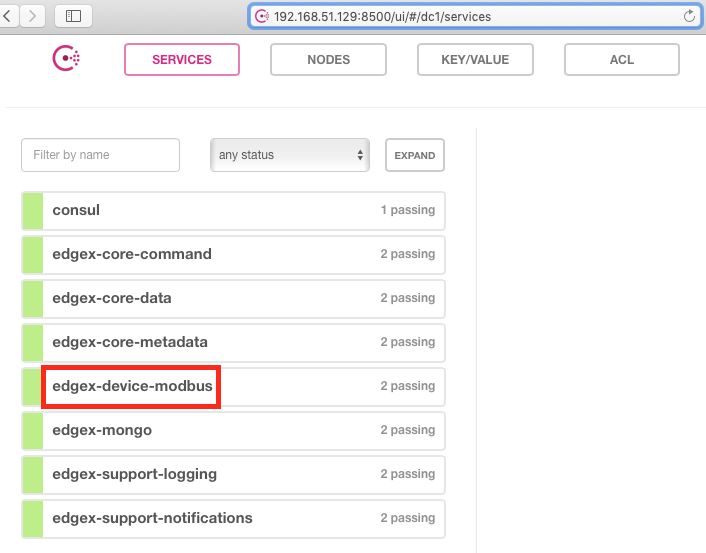
After the services start, check the consul dashboard as follows:
6.3.6. Alternative Set-up
Instead of using the configuration described above, you can create the Device Profile and Device using the Core Metadata API after the services start up. To do this, complete the following:
Upload the device profile, illustrated above, to metadata using a POST to http://localhost:48081/api/v1/deviceprofile/uploadfile and add the file as key “file” to the body in form-data format. The created ID is returned. The following example command uses curl to send the request:
$ curl localhost:48081/api/v1/deviceprofile/uploadfile \
  -F "file=@DENT.Mod.PS6037.profile.yaml"
Ensure that the Modbus Device Service is running, and then adjust the service name in the code shown below to match if necessary or if using other Device Services
Add the device with a POST to http://localhost:48081/api/v1/device, and the body of the command similar to the following:
$ curl localhost:48081/api/v1/device -H "Content-Type:application/json" -X POST \
  -d '{
   "name" :"Modbus-TCP-Device",
   "description":"This device is a product for monitoring and controlling digital inputs and outputs over a LAN.",
   "adminState":"UNLOCKED",
   "operatingState":"ENABLED",
   "protocols":{
      "modbus-tcp":{
         "Address" : "172.17.0.1",
         "Port" : "1502",
         "UnitID" : "1"
      }
   },
   "labels":[
      "Air conditioner",
      "modbus TCP"
   ],
   "service":{
      "name":"edgex-device-modbus",
      "adminState": "unlocked",
      "operatingState": "enabled"
   },
   "profile":{
      "name":"Network Power Meter"
   }
}'
Note that the profile name must match the name of the device profile being used.
6.3.7. Execute Commands
Now we’re ready to run some commands.
6.3.7.1. Find Executable Commands
Use the following query to find the executable commands:
$ curl http://your-edgex-server-ip:48082/api/v1/device | json_pp
  % Total    % Received % Xferd  Average Speed   Time    Time     Time  Current
                                 Dload  Upload   Total   Spent    Left  Speed
100  1718  100  1718    0     0  14081      0 --:--:-- --:--:-- --:--:-- 14081
[
   {
      "id" : "56dcf3ad-52d8-4d12-a2d0-ae53c177ae3d",
      "commands" : [
         {
            "put" : {
               "url" : "http://edgex-core-command:48082/api/v1/device/56dcf3ad-52d8-4d12-a2d0-ae53c177ae3d/command/67b35f63-8f94-427b-a60c-188bf9e0633a",
               "parameterNames" : [
                  "DemandWindowSize",
                  "LineFrequency"
               ],
               "path" : "/api/v1/device/{deviceId}/Configuration"
            },
            "id" : "67b35f63-8f94-427b-a60c-188bf9e0633a",
            "get" : {
               "url" : "http://edgex-core-command:48082/api/v1/device/56dcf3ad-52d8-4d12-a2d0-ae53c177ae3d/command/67b35f63-8f94-427b-a60c-188bf9e0633a",
               "responses" : [
                  {
                     "description" : "internal server error",
                     "code" : "500"
                  }
               ],
               "path" : "/api/v1/device/{deviceId}/Configuration"
            },
            ...
            "name" : "Configuration"
         }
      ],
      ...
   },
   {
      ....
   }
]
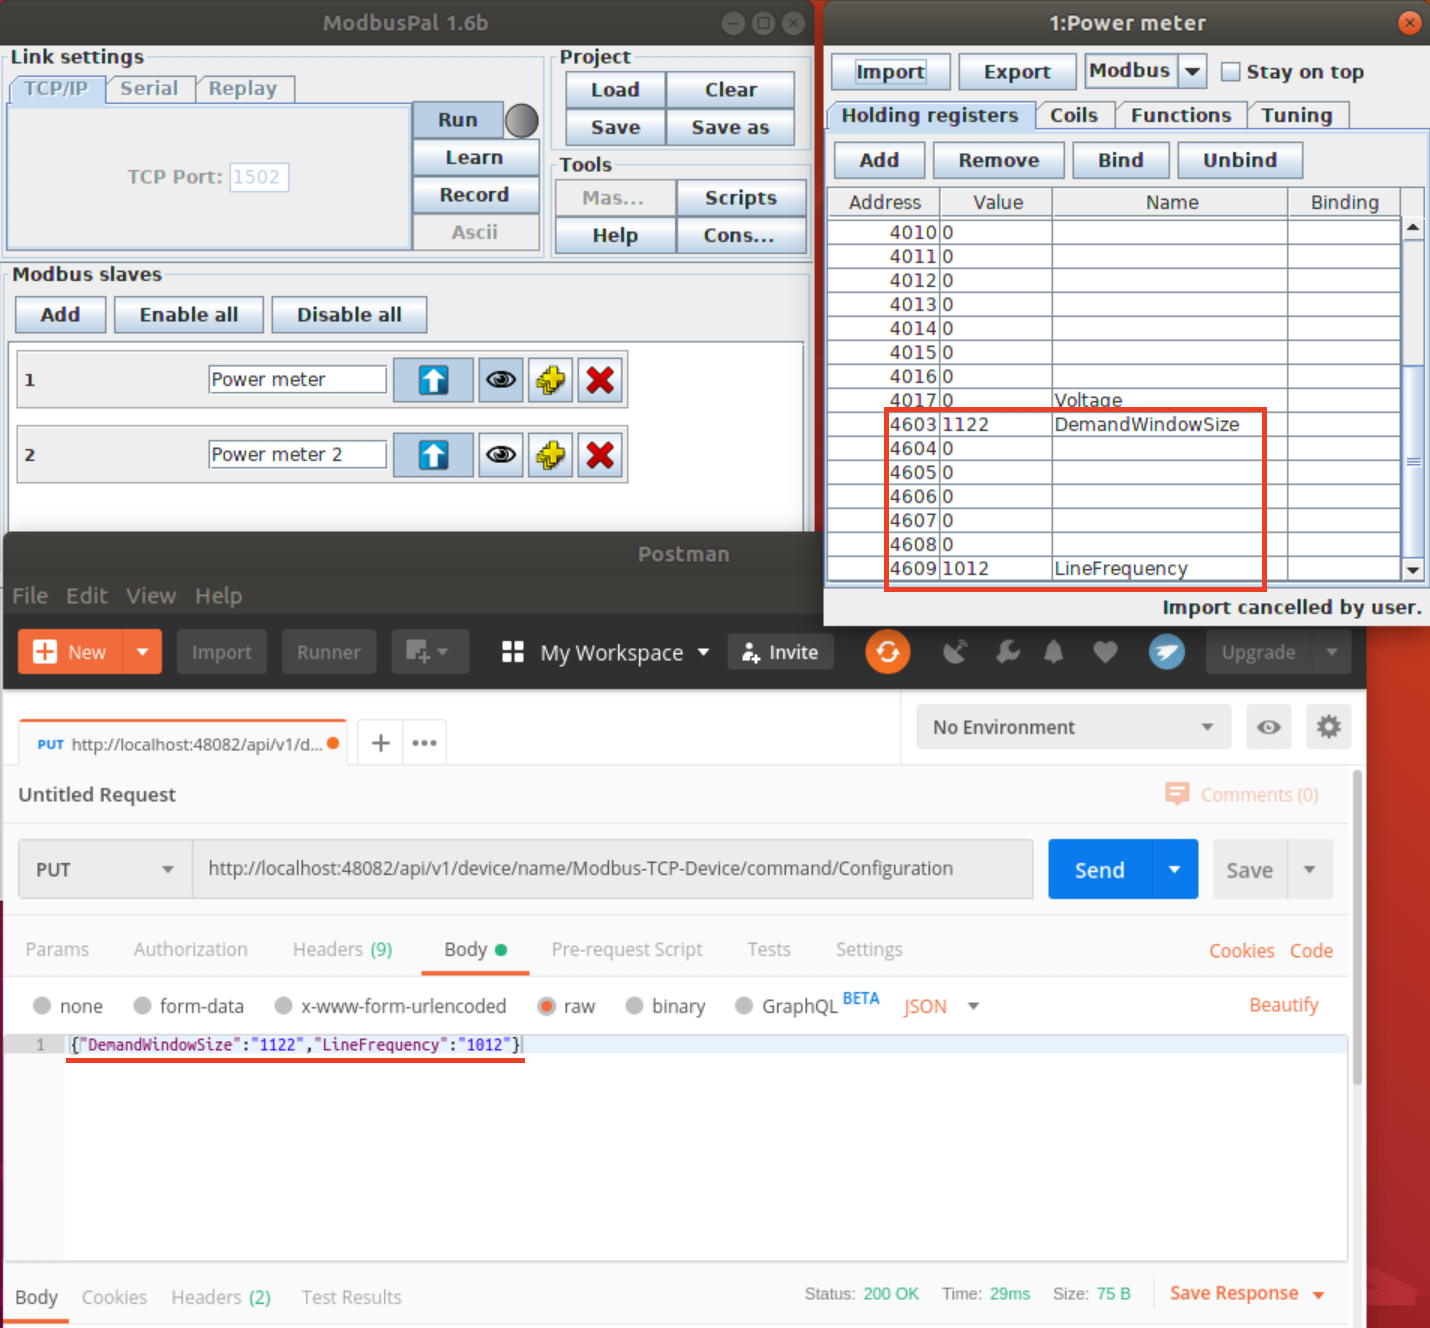
6.3.7.2. Execute PUT command
Execute a put command according to the url and parameterNames, replacing [host] with the server IP when running the edgex-core-command. This can be done in either of the following ways:
$ curl http://your-edgex-server-ip:48082/api/v1/device/56dcf3ad-52d8-4d12-a2d0-ae53c177ae3d/command/67b35f63-8f94-427b-a60c-188bf9e0633a \
    -H "Content-Type:application/json" -X PUT  \
    -d '{"DemandWindowSize":"1122","LineFrequency":"1012"}'
or:
$ curl "http://your-edgex-server-ip:48082/api/v1/device/name/Modbus-TCP-Device/command/Configuration" \
    -H "Content-Type:application/json" -X PUT  \
    -d '{"DemandWindowSize":"1122","LineFrequency":"1012"}'
Verify the result:
6.3.7.3. Execute GET command
Execute a get command as follows:
$ curl "http://your-edgex-server-ip:48082/api/v1/device/name/Modbus-TCP-Device/command/Configuration" | json_pp
  % Total    % Received % Xferd  Average Speed   Time    Time     Time  Current
                                 Dload  Upload   Total   Spent    Left  Speed
100   254  100   254    0     0   2956      0 --:--:-- --:--:-- --:--:--  2988
{
   "readings" : [
      {
         "device" : "Modbus-TCP-Device",
         "name" : "DemandWindowSize",
         "value" : "1122",
         "origin" : 1573817688285597000
      },
      {
         "name" : "LineFrequency",
         "device" : "Modbus-TCP-Device",
         "value" : "1012",
         "origin" : 1573817688289551000
      }
   ],
   "device" : "Modbus-TCP-Device",
   "origin" : 1573817688289622500
}
6.3.8. Schedule Job
The schedule job is defined in the [[DeviceList.AutoEvents]] section of the TOML configuration file:
# Pre-define Devices
[[DeviceList]]
  Name = "Modbus-TCP-Device"
  Profile = "Network Power Meter"
  Description = "This device is a product for monitoring and controlling digital inputs and outputs over a LAN."
  labels = [ "Air conditioner","modbus TCP" ]
  [DeviceList.Protocols]
    [DeviceList.Protocols.modbus-tcp]
       Address = "172.17.0.1"
       Port = "1502"
       UnitID = "1"
  [[DeviceList.AutoEvents]]
    Frequency = "50s"
    OnChange = false
    Resource = "Configuration"
After the service starts, query core-data’s reading API. The results show that the service automatically executes the command every 50 secs, as shown below:
$ curl http://your-edgex-server-ip:48080/api/v1/reading | json_pp
  % Total    % Received % Xferd  Average Speed   Time    Time     Time  Current
                                 Dload  Upload   Total   Spent    Left  Speed
100  1115  100  1115    0     0  73340      0 --:--:-- --:--:-- --:--:-- 74333
[
   {
      "value" : "1122",
      "created" : 1559140272386,
      "device" : "Modbus-TCP-Device",
      "name" : "DemandWindowSize",
      "modified" : 1559140272386,
      "id" : "bd966c85-af0d-4981-a93c-595a95eef25a",
      "origin" : 1559140272339597000
   },
   {
      "modified" : 1559140272386,
      "origin" : 1559140272367551000,
      "id" : "deaf0863-8dc5-47b0-9ce9-d9a405c0b356",
      "value" : "1012",
      "name" : "LineFrequency",
      "device" : "Modbus-TCP-Device",
      "created" : 1559140272386
   },
   {
      "value" : "0",
      "device" : "Modbus-TCP-Device",
      "created" : 1559140222335,
      "name" : "DemandWindowSize",
      "modified" : 1559140222335,
      "id" : "f4808bc6-a9ee-4e82-99f5-7e15c501fb7d",
      "origin" : 1559140222272597000
   },
   {
      "device" : "Modbus-TCP-Device",
      "created" : 1559140222335,
      "name" : "LineFrequency",
      "value" : "0",
      "origin" : 1559140222299562000,
      "id" : "d3af8e81-c627-45d7-8e39-ad1c1a0a582d",
      "modified" : 1559140222335
   }
]