6.5. MQTT - Adding a Device to EdgeX
EdgeX - Fuji Release
6.5.1. Overview
In this example, we use the simulator instead of real device. This provides a straight-forward way to test the device-mqtt features.

6.5.2. Run an MQTT Broker
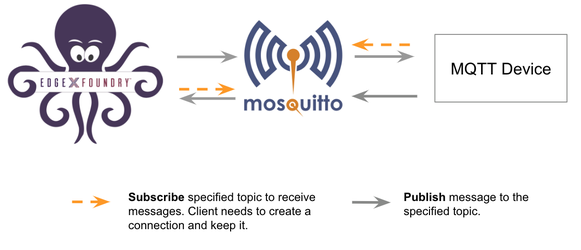
Eclipse Mosquitto is an open source (EPL/EDL licensed) message broker that implements the MQTT protocol versions 5.0, 3.1.1 and 3.1.
Run Mosquitto using the following docker command:
docker run -d --rm --name broker -p 1883:1883 eclipse-mosquitto
6.5.3. Run an MQTT Device Simulator

This simulator has three behaviors:
- Publish random number data every 15 seconds
- Receive the reading request, then return the response
- Receive the put request, then change the device value
We created the following script to simulate the MQTT device:
// mock-device.js
function getRandomFloat(min, max) {
    return Math.random() * (max - min) + min;
}

const deviceName = "MQ_DEVICE";
let message = "test-message";

// 1. Publish random number every 15 seconds
schedule('*/15 * * * * *', ()=>{
    let body = {
        "name": deviceName,
        "cmd": "randfloat32",
        "randfloat32": getRandomFloat(25,29).toFixed(1)
    };
    publish( 'DataTopic', JSON.stringify(body));
});

// 2. Receive the reading request, then return the response
// 3. Receive the put request, then change the device value
subscribe( "CommandTopic" , (topic, val) => {
    var data = val;
    if (data.method == "set") {
        message = data[data.cmd]
    }else{
        switch(data.cmd) {
            case "ping":
              data.ping = "pong";
              break;
            case "message":
              data.message = message;
              break;
            case "randfloat32":
                data.randfloat32 = getRandomFloat(25,29).toFixed(1);
                break;
        case "randfloat64":
                data.randfloat64 = getRandomFloat(10,1).toFixed(5);
                break;
          }
    }
    publish( "ResponseTopic", JSON.stringify(data));
});
To run the device simulator, enter the commands shown below with the following changes:
Replace the /path/to/mqtt-scripts in the example mv command with the correct path
Replace the mqtt-broker-ip in the example docker run command with the correct broker IP:
mv mock-device.js /path/to/mqtt-scripts
docker run -d --restart=always --name=mqtt-scripts \
  -v /path/to/mqtt-scripts:/scripts  \
  dersimn/mqtt-scripts --url mqtt://mqtt-broker-ip --dir /scripts
6.5.4. Check your MQTT broker is work
Install the MQTT client tool from https://mosquitto.org/
Subscribe All topics from MQTT broker:
./mosquitto_sub -v -t '#'
Send the command to MQTT broker:
./mosquitto_pub -t 'CommandTopic' -m '{"name":"MQTT test device","method":"get","cmd":"ping"}'
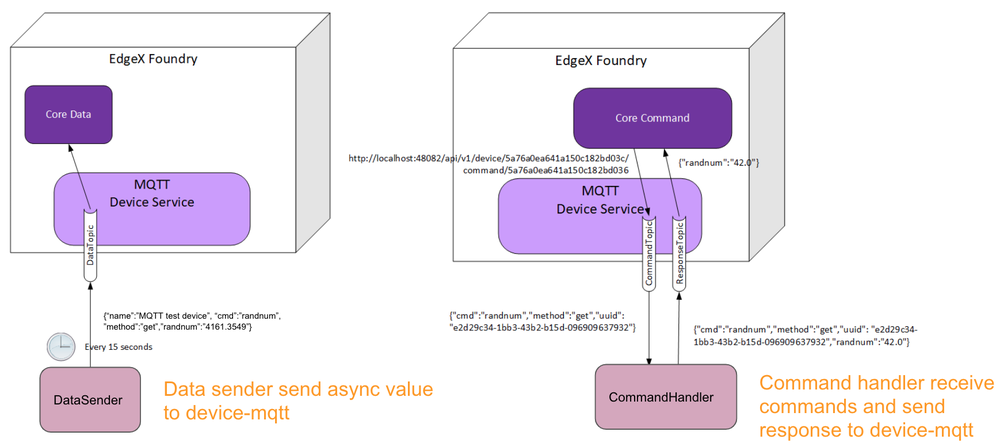
This is illustrated below:

The async value keeps logging to the console via the DataTopic. The mqtt-scripts receive the request from the CommandTopic and send the response to the ReponseTopic.
6.5.4.1. Setup
In this section, we create a folder that contains files required for deployment:
- device-service-demo
  |- docker-compose.yml
  |- mqtt
     |- configuration.toml
     |- mqtt.test.device.profile.yml
6.5.5. Device Profile (mqtt.test.device.profile.yml)
The DeviceProfile defines the device’s values and operation method, which can be Read or Write.
Create a device profile, named mqtt.test.device.profile.yml, with the following content:
# mqtt.test.device.profile.yml
name: "Test.Device.MQTT.Profile"
manufacturer: "Dell"
model: "MQTT-2"
labels:
- "test"
description: "Test device profile"
deviceResources:

- name: randfloat32
  description: "device random number with Base64 encoding"
  properties:
    value:
      { type: "Float32", size: "4", readWrite: "R", defaultValue: "0.00", minimum: "100.00", maximum: "0.00", floatEncoding: "Base64" }
    units:
      { type: "String", readWrite: "R", defaultValue: "" }
- name: randfloat64
  description: "device random number with e notion"
  properties:
    value:
      { type: "Float64", size: "4", readWrite: "R", defaultValue: "0.00", minimum: "100.00", maximum: "0.00", floatEncoding: "eNotation" }
    units:
      { type: "String", readWrite: "R", defaultValue: "" }
-
  name: ping
  description: "device awake"
  properties:
    value:
      { type: "String", size: "0", readWrite: "R", defaultValue: "oops" }
    units:
      { type: "String", readWrite: "R", defaultValue: "" }
-
  name: message
  description: "device notification message"
  properties:
    value:
      { type: "String", size: "0", readWrite: "W" ,scale: "", offset: "", base: ""  }
    units:
      { type: "String", readWrite: "R", defaultValue: "" }

deviceCommands:
- name: testrandfloat32
  get:
    - { index: "1", operation: "get", deviceResource: "randfloat32"}
- name: testrandfloat64
  get:
    - { index: "1", operation: "get", deviceResource: "randfloat64"}
-
  name: testping
  get:
    - { index: "1", operation: "get", deviceResource: "ping"}
-
  name: testmessage
  get:
    - { index: "1", operation: "get", deviceResource: "message"}
  set:
    - { index: "1", operation: "set", deviceResource: "message"}

coreCommands:
- name: testrandfloat32
  get:
    path: "/api/v1/device/{deviceId}/testrandfloat32"
    responses:
    -
      code: "200"
      description: "get the random float32 value"
      expectedValues: ["randfloat32"]
    - code: "500"
      description: "internal server error"
      expectedValues: []
- name: testrandfloat64
  get:
    path: "/api/v1/device/{deviceId}/testrandfloat64"
    responses:
      - code: "200"
        description: "get the random float64 value"
        expectedValues: ["randfloat64"]
      - code: "500"
        description: "internal server error"
        expectedValues: []
-
  name: testping
  get:
    path: "/api/v1/device/{deviceId}/testping"
    responses:
    -
      code: "200"
      description: "ping the device"
      expectedValues: ["ping"]
    - code: "500"
      description: "internal server error"
      expectedValues: []
-
  name: testmessage
  get:
    path: "/api/v1/device/{deviceId}/testmessage"
    responses:
    -
      code: "200"
      description: "get the message"
      expectedValues: ["message"]
    - code: "500"
      description: "internal server error"
      expectedValues: []
  put:
    path: "/api/v1/device/{deviceId}/testmessage"
    parameterNames: ["message"]
    responses:
    -
      code: "204"
      description: "set the message."
      expectedValues: []
    - code: "500"
      description: "internal server error"
      expectedValues: []
6.5.6. Device Service Configuration (configuration.toml)
Use this configuration file to define devices and schedule jobs. device-mqtt generates a relative instance on start-up.
MQTT is subscribe/publish pattern, so we must define the MQTT connection information in the [DeviceList.Protocols] section of the configuration file.
Create the configuration file(example), named configuration.toml, as shown below replacing the host IP with your host address:
# configuration.toml
[Writable]
LogLevel = 'DEBUG'

[Service]
Host = "edgex-device-mqtt"
Port = 49982
ConnectRetries = 3
Labels = []
OpenMsg = "device mqtt started"
Timeout = 5000
EnableAsyncReadings = true
AsyncBufferSize = 16

[Registry]
Host = "edgex-core-consul"
Port = 8500
CheckInterval = "10s"
FailLimit = 3
FailWaitTime = 10
Type = "consul"

[Logging]
EnableRemote = false
File = "./device-mqtt.log"

[Clients]
  [Clients.Data]
  Name = "edgex-core-data"
  Protocol = "http"
  Host = "edgex-core-data"
  Port = 48080
  Timeout = 50000

  [Clients.Metadata]
  Name = "edgex-core-metadata"
  Protocol = "http"
  Host = "edgex-core-metadata"
  Port = 48081
  Timeout = 50000

  [Clients.Logging]
  Name = "edgex-support-logging"
  Protocol = "http"
  Host ="edgex-support-logging"
  Port = 48061

[Device]
  DataTransform = true
  InitCmd = ""
  InitCmdArgs = ""
  MaxCmdOps = 128
  MaxCmdValueLen = 256
  RemoveCmd = ""
  RemoveCmdArgs = ""
  ProfilesDir = "/custom-config"

# Pre-define Devices
[[DeviceList]]
  Name = "MQ_DEVICE"
  Profile = "Test.Device.MQTT.Profile"
  Description = "General MQTT device"
  Labels = [ "MQTT"]
  [DeviceList.Protocols]
    [DeviceList.Protocols.mqtt]
       Schema = "tcp"
       Host = "172.17.0.1"
       Port = "1883"
       ClientId = "CommandPublisher"
       User = ""
       Password = ""
       Topic = "CommandTopic"

# Driver configs
[Driver]
IncomingSchema = "tcp"
IncomingHost = "172.17.0.1"
IncomingPort = "1883"
IncomingUser = ""
IncomingPassword = ""
IncomingQos = "0"
IncomingKeepAlive = "3600"
IncomingClientId = "IncomingDataSubscriber"
IncomingTopic = "DataTopic"
ResponseSchema = "tcp"
ResponseHost = "172.17.0.1"
ResponsePort = "1883"
ResponseUser = ""
ResponsePassword = ""
ResponseQos = "0"
ResponseKeepAlive = "3600"
ResponseClientId = "CommandResponseSubscriber"
ResponseTopic = "ResponseTopic"
In the Driver configs section:
- IncomingXxx defines the DataTopic for receiving an async value from the device
- ResponseXxx defines the ResponseTopic for receiving a command response from the device
6.5.7. Add Device Service to docker-compose File (docker-compose.yml)
Download the docker-compose file from https://github.com/edgexfoundry/developer-scripts/blob/master/releases/fuji/compose-files/docker-compose-fuji-1.1.0.yml.
Because we deploy EdgeX using docker-compose, we must add device-mqtt to the docker-compose file. If you have prepared configuration files, you can mount them using volumes and change the entrypoint for device-mqtt internal use.
This is illustrated in the following docker-compose file snippet:
device-mqtt:
  image: edgexfoundry/docker-device-mqtt-go:1.1.0
  ports:
    - "49982:49982"
  container_name: edgex-device-mqtt
  hostname: edgex-device-mqtt
  networks:
    - edgex-network
  volumes:
    - db-data:/data/db
    - log-data:/edgex/logs
    - consul-config:/consul/config
    - consul-data:/consul/data
    - ./mqtt:/custom-config
  depends_on:
    - data
    - command
  entrypoint:
    - /device-mqtt
    - --registry=consul://edgex-core-consul:8500
    - --confdir=/custom-config
When using Device Services, the user has to provide the registry URL in –registry argument.
6.5.7.1. Start EdgeX Foundry on Docker
Once the following folder has been populated, we can deploy EdgeX:
- device-service-demo
  |- docker-compose.yml
  |- mqtt
     |- configuration.toml
     |- mqtt.test.device.profile.yml
Deploy EdgeX using the following commands:
cd path/to/device-service-demo
docker-compose pull
docker-compose up -d
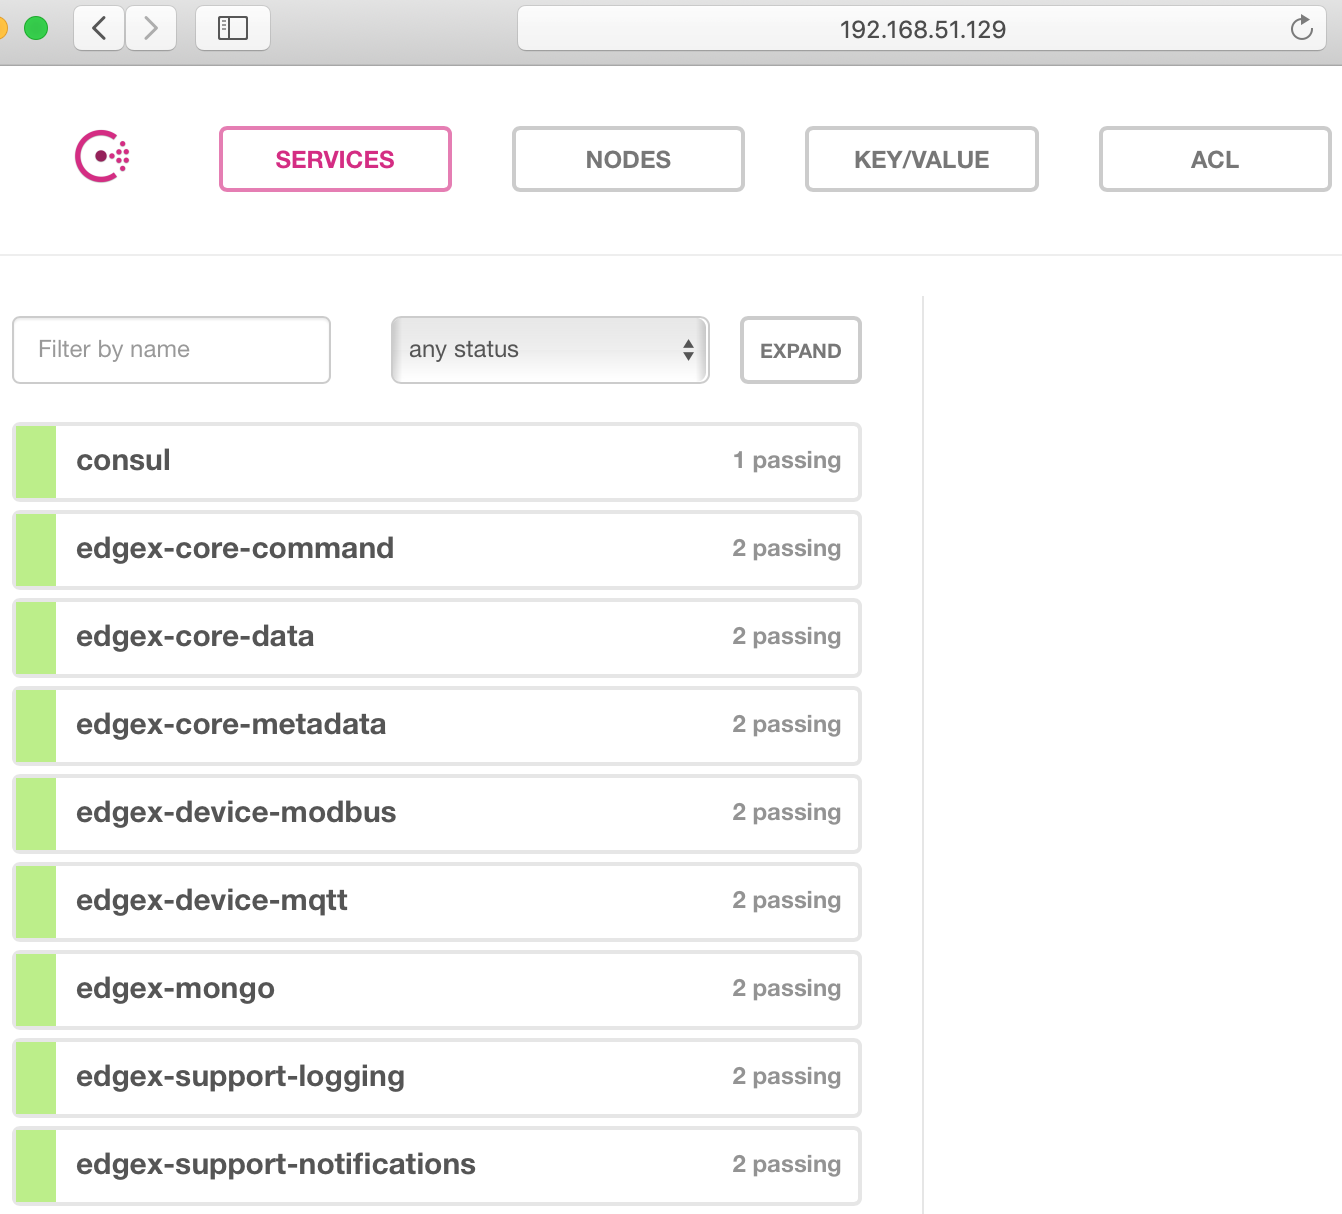
After the services start, check the consul dashboard as follows:
6.5.7.2. Execute Commands
Now we’re ready to run some commands.
6.5.8. Find Executable Commands
Use the following query to find executable commands:
$ curl http://your-edgex-server-ip:48082/api/v1/device | json_pp
  % Total    % Received % Xferd  Average Speed   Time    Time     Time  Current
                                 Dload  Upload   Total   Spent    Left  Speed
100  1972  100  1972    0     0  64349      0 --:--:-- --:--:-- --:--:-- 65733
[
   {
      "location" : null,
      "adminState" : "UNLOCKED",
      "commands" : [
         {
            ...
         },
         {
            ...
         },
         {
            "get" : {
               "responses" : [
                  {
                     "code" : "500",
                     "description" : "internal server error"
                  }
               ],
               "path" : "/api/v1/device/{deviceId}/testmessage",
               "url" : "http://edgex-core-command:48082/api/v1/device/ddb2f5cf-eec2-4345-86ee-f0d87e6f77ff/command/0c257a37-2f72-4d23-b2b1-2c08e895060a"
            },
            "modified" : 1559195042046,
            "name" : "testmessage",
            "put" : {
               "parameterNames" : [
                  "message"
               ],
               "path" : "/api/v1/device/{deviceId}/testmessage",
               "url" : "http://edgex-core-command:48082/api/v1/device/ddb2f5cf-eec2-4345-86ee-f0d87e6f77ff/command/0c257a37-2f72-4d23-b2b1-2c08e895060a"
            },
            "created" : 1559195042046,
            "id" : "0c257a37-2f72-4d23-b2b1-2c08e895060a"
         }
      ],
      "operatingState" : "ENABLED",
      "name" : "MQ_DEVICE",
      "id" : "ddb2f5cf-eec2-4345-86ee-f0d87e6f77ff",
      "labels" : [
         "MQTT"
      ]
   }
]
6.5.9. Execute put Command
Execute a put command according to the url and parameterNames, replacing [host] with the server IP when running the edgex-core-command. This can be done in either of the following ways:
$ curl http://your-edgex-server-ip:48082/api/v1/device/ddb2f5cf-eec2-4345-86ee-f0d87e6f77ff/command/0c257a37-2f72-4d23-b2b1-2c08e895060a \
    -H "Content-Type:application/json" -X PUT  \
    -d '{"message":"Hello!"}'
or
- $ curl “http://your-edgex-server-ip:48082/api/v1/device/name/MQ_DEVICE/command/testmessage”
- -H “Content-Type:application/json” -X PUT -d ‘{“message”:”Hello!”}’
6.5.10. Execute get Command
Execute a get command as follows:
$ curl "http://your-edgex-server-ip:48082/api/v1/device/name/MQ_DEVICE/command/testmessage" | json_pp
  % Total    % Received % Xferd  Average Speed   Time    Time     Time  Current
                                 Dload  Upload   Total   Spent    Left  Speed
100   139  100   139    0     0    132      0  0:00:01  0:00:01 --:--:--   132
{
   "readings" : [
      {
         "device" : "MQ_DEVICE",
         "origin" : 1573636646252261200,
         "value" : "Hello!",
         "name" : "message"
      }
   ],
   "EncodedEvent" : null,
   "device" : "MQ_DEVICE",
   "origin" : 1573636646256247000
}
6.5.11. Schedule Job
The schedule job is defined in the [[DeviceList.AutoEvents]] section of the TOML configuration file(auto event example):
# Pre-define Devices
[[DeviceList]]
  Name = "MQ_DEVICE"
  Profile = "Test.Device.MQTT.Profile"
  Description = "General MQTT device"
  Labels = [ "MQTT"]
  [DeviceList.Protocols]
    [DeviceList.Protocols.mqtt]
       Schema = "tcp"
       Host = "172.17.0.1"
       Port = "1883"
       ClientId = "CommandPublisher"
       User = ""
       Password = ""
       Topic = "CommandTopic"
  [[DeviceList.AutoEvents]]
    Frequency = "30s"
    OnChange = false
    Resource = "testrandfloat32"
After the service starts, query core-data’s reading API. The results show that the service auto-executes the command every 30 secs, as shown below:
$ curl http://your-edgex-server-ip:48080/api/v1/reading | json_pp
  % Total    % Received % Xferd  Average Speed   Time    Time     Time  Current
                                 Dload  Upload   Total   Spent    Left  Speed
100  1613  100  1613    0     0   372k      0 --:--:-- --:--:-- --:--:--  393k
[
   {
      "value" : "1.212300e+01",
      "origin" : 1559197206092246000,
      "modified" : 1559197206104,
      "id" : "59f2a768-ad72-49a1-9df9-700d8599a890",
      "created" : 1559197206104,
      "device" : "MQ_DEVICE",
      "name" : "randfloat32"
   },
   {
      ...
   },
   {
      "name" : "randfloat32",
      "device" : "MQ_DEVICE",
      "modified" : 1559197175109,
      "created" : 1559197175109,
      "id" : "f9dc39e0-5326-45d0-831d-fd0cd106fe2f",
      "origin" : 1559197175098315000,
      "value" : "1.212300e+01"
   },
]
6.5.11.1. Async Device Reading
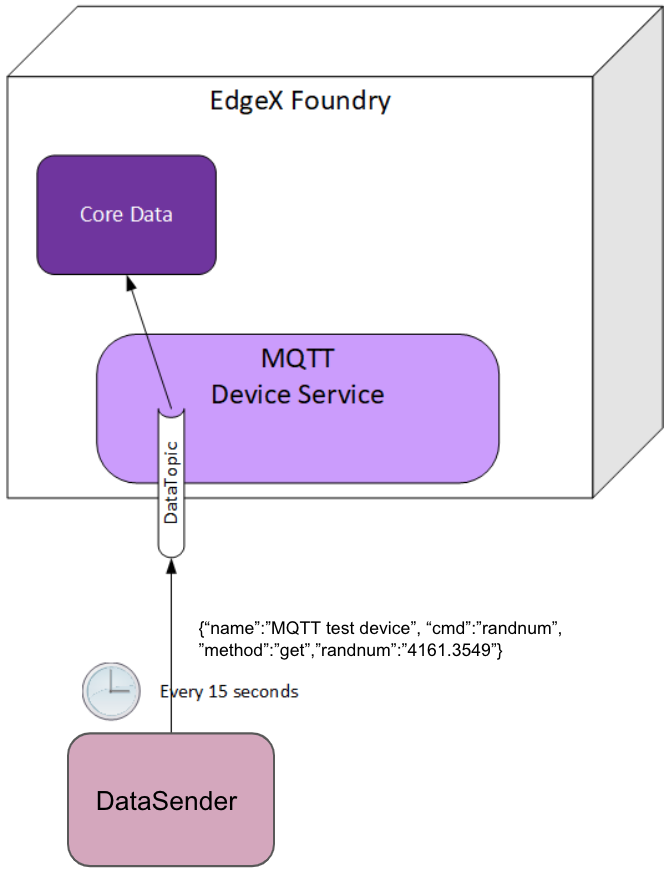
device-mqtt subscribes to a DataTopic, which is wait for real *device to send value to broker, then device-mqtt parses the value and sends it back to core-data.
The data format contains the following values:
- name = device name
- cmd = deviceResource name
- method = get or put
- cmd = device reading
You must define this connection information in the driver configuration file, as follows:
[Driver]
IncomingSchema = "tcp"
IncomingHost = "172.17.0.1"
IncomingPort = "1883"
IncomingUser = ""
IncomingPassword = ""
IncomingQos = "0"
IncomingKeepAlive = "3600"
IncomingClientId = "IncomingDataSubscriber"
IncomingTopic = "DataTopic"
The following results show that the mock device sent the reading every 15 secs:
$ curl http://your-edgex-server-ip:48080/api/v1/reading | json_pp
  % Total    % Received % Xferd  Average Speed   Time    Time     Time  Current
                                 Dload  Upload   Total   Spent    Left  Speed
100   539  100   539    0     0   169k      0 --:--:-- --:--:-- --:--:--  175k
[
   {
      ...
   },
   {
      "value" : "1.212300e+01",
      "modified" : 1573636161072,
      "name" : "randfloat32",
      "origin" : 1573636161064629600,
      "created" : 1573636161072,
      "id" : "b5147fed-ef0c-487b-a8f9-8e9b69b62de1",
      "device" : "MQ_DEVICE"
   },
   {
      "id" : "99ae3685-c575-44ab-833d-cccd42178d69",
      "device" : "MQ_DEVICE",
      "origin" : 1573636158767070600,
      "created" : 1573636158777,
      "name" : "randfloat32",
      "modified" : 1573636158777,
      "value" : "1.212300e+01"
   }
]

