4.3.1. Writing a Device Service in Go
The EdgeX Device Service SDK helps developers quickly create new device connectors for EdgeX by providing the common framework that each Device Service needs. The framework provides a pattern for provisioning devices. It provides common template code to receive and react to command (a.k.a. actuation) requests. Finally, the framework provides the common code to help get the data coming from the sensor into EdgeX Core Data (often referred to as data ingestion). With the SDK, developers are left to focus on the code that is specific to the communications with the device via the protocol of the device.
In this guide, you create a simple Device Service that generates a random number in place of getting data from an actual sensor. In this way, you get to explore some of the framework and work necessary to complete a Device Service without actually having a device to talk to.
4.3.1.1. Install dependencies
Creating a Device Service requires a little programming in Go. Go Lang (version 1.11 or better) must be installed on your system to complete this lab. Follow the instructions in the link below to install Go if it is not already installed on your platform:
You need a Git tool to pull the Device Service Go SDK code from the EdgeX Foundry Git repository. Follow the instructions in the link below to install Git for your platform:
You will also need a “make” program. On Ubuntu Linux environments, this can be accomplished with the following command:
sudo apt install build-essential
Finally, you need a simple text editor (or Go Lang IDE).
4.3.1.2. Get the EdgeX Device SDK for Go
Complete the following steps to create a folder on your file system, download the Device Services SDK, then you pull the SDK to your system, and finally create the new EdgeX Device Service from the SDK templating code.
Create a collection of nested folders, ~/go/src/github.com/edgexfoundry on your file system. This folder will eventually hold your new Device Service. In Linux, this can be done with a single mkdir (with -p switch) command:
mkdir -p ~/go/src/github.com/edgexfoundry
In a terminal window, change directories to the folder you created:
cd ~/go/src/github.com/edgexfoundry
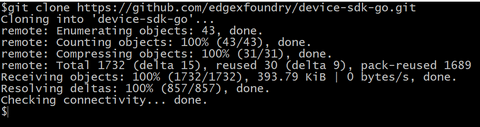
Enter the following command to pull down the EdgeX Device Service SDK in Go (there is also a Device Service SDK in C):
git clone https://github.com/edgexfoundry/device-sdk-go.git
Create a folder for the Device Service that we are going to develop. In this step, you are naming the folder to the name you want to give your new Device Service. Standard practice in EdgeX is to prefix the name of a Device Service with
device-:mkdir device-simple
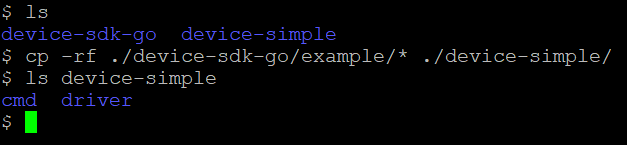
Copy the example code from device-sdk-go to device-simple:
cp -rf ./device-sdk-go/example/* ./device-simple/
Copy Makefile to device-simple:
cp ./device-sdk-go/Makefile ./device-simple

Copy VERSION to device-simple:
cp ./device-sdk-go/Version ./device-simple/

Copy version.go to device-simple:
cp ./device-sdk-go/version.go ./device-simple/
4.3.1.3. Starting a new Device Service project
The device-sdk-go comes with example code to create a new Device Service. Complete the following steps to modify the copy of the example code to use in your new service.
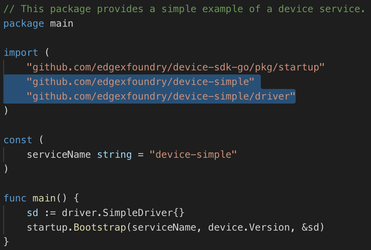
Edit the main.go file in the cmd/device-simple folder. Modify the import statements to replace “device-sdk-go/example/driver” to “device-simple/driver” from the paths in the import statements. Save the file when you have finished editing.
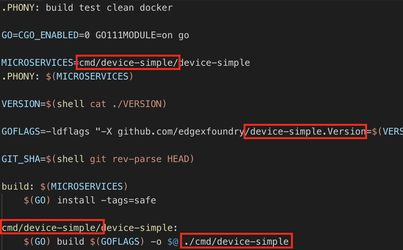
Open Makefile in your favorite text editor and make the following changes
Replace
MICROSERVICESMICROSERVICES=example/cmd/device-simple/device-simple
with
MICROSERVICES=cmd/device-simple/device-simple
Modify
GOFLAGS:GOFLAGS=-ldflags "-X github.com/edgexfoundry/device-sdk-go.Version=$(VERSION)"
line to refer to the new service with:
GOFLAGS=-ldflags "-X github.com/edgexfoundry/device-simple.Version=$(VERSION)"
Modify
build:example/cmd/device-simple/device-simple: $(GO) build $(GOFLAGS) -o $@ ./example/cmd/device-simple
to:
cmd/device-simple/device-simple:
  $(GO) build $(GOFLAGS) -o $@ ./cmd/device-simple
Save the file.
Enter the following command to create the initial module definition and write it to the go.mod file:
GO111MODULE=on go mode init
4.3.1.4. Build your Device Service
To ensure that the code you have moved and updated still works, build the current Device Service.
In a terminal window, change directories to the device-simple folder (the folder containing the Makefile):
device-simple
├── cmd
│   └── device-simple
│       ├── Dockerfile
│       ├── main.go
│       └── res
│           ├── Simple-Driver.yaml
│           ├── configuration.toml
│           ├── docker
│           │   └── configuration.toml
│           ├── off.jpg
│           └── on.png
├── driver
│   └── simpledriver.go
├── Makefile
├── Version
├── version.go
├── go.mod
└── go.sum
Build the service by issuing the following command:
make build

If there are no errors, your service is ready for you to add customizations to generate data values as if there was a sensor attached. If there are errors, retrace your steps to correct the error and try to build again. Ask you instructor for help in finding the issue if you are unable to locate it given the error messages you receive from the build process.

4.3.1.5. Customize your Device Service
The Device Service you are creating isn’t going to talk to a real device. Instead, it is going to generate a random number where the service would make a call to get sensor data from the actual device. By so doing, you see where the EdgeX Device Service would make a call to a local device (using its protocol and device drivers under the covers) to provide EdgeX with its sensor readings:
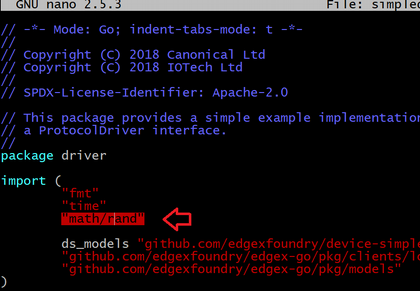
Locate the simpledriver.go file in the /driver folder and open it with your favorite editor.

In the import() area at the top of the file, add “math/rand” under “time”.
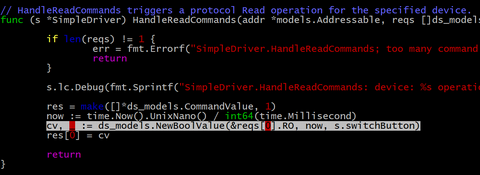
Locate the HandleReadCommands() function in this file. Notice the following line of code in this file:
cv, _ := dsModels.NewBoolValue(reqs[0].DeviceResourceName, now, s.switchButton)
Replace the two lines of code with the following:
if reqs[0].DeviceResourceName == "randomnumber" {
    cv, _ := dsModels.NewInt32Value(reqs[0].DeviceResourceName, now, int32(rand.Intn(100)))
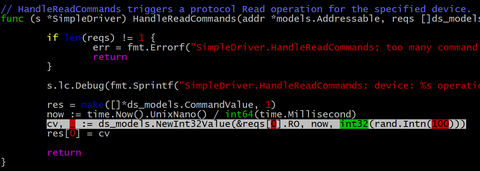
The first line of code to confirmed request is for the customized resource “randomnumber”. Also, the second line of code generates an integer (between 0 and 100) and uses that as the value the Device Service sends to EdgeX – mimicking the collection of data from a real device. It is here that the Device Service would normally capture some sensor reading from a device and send the data to EdgeX. The line of code you just added is where you’d need to do some customization work to talk to the sensor, get the sensor’s latest sensor values and send them into EdgeX.
Save the simpledriver.go file
4.3.1.6. Creating your Device Profile
A Device Profile is a YAML file that describes a class of device to EdgeX. General characteristics about the type of device, the data these devices provide, and how to command the device is all provided in a Device Profile. Device Services use the Device Profile to understand what data is being collected from the Device (in some cases providing information used by the Device Service to know how to communicate with the device and get the desired sensor readings). A Device Profile is needed to describe the data to collect from the simple random number generating Device Service.
Do the following:
Explore the files in the cmd/device-simple/res folder. Take note of the example Device Profile YAML file that is already there (Simple-Driver.yml). You can explore the contents of this file to see how devices are represented by YAML. In particular, note how fields or properties of a sensor are represented by “deviceResources”. Command to be issued to the device are represented by “deviceCommands”.
Download
random-generator-device.yamlto the cmd/device-simple/res folder.Open the random-generator-device.yaml file in a text editor. In this Device Profile, you define that the device you are describing to EdgeX has a single property (or deviceResource) that EdgeX needs to know about - in this case, the property is the “randomnumber”. Note how the deviceResource is typed.
In real world IoT situations, this deviceResource list could be extensive and be filled with all different types of data.
Note also how the Device Profile describes REST commands that can be used by others to call on (or “get”) the random number from the Device Service.
4.3.1.7. Configuring your Device Service
Now update the configuration for your new Device Service – changing the port it operates on (so as not to conflict with other Device Services), altering the auto event frequency of when the data is collected from the Device Service (every 10 seconds in this example), and setting up the initial provisioning of the random number generating device when the service starts.
Download configuration.toml to the cmd/device-simple/res folder (this will overwrite an existing file – that’s ok).
4.3.1.8. Rebuild your Device Service
Just as you did before, you are ready to build the device-simple service – creating the executable program that is your Device Service:
In a terminal window, change directories to the base device-simple folder (containing the Makefile).
Build the Device Service by issuing the following command:
make build

If there are no errors, your service has now been created and is available in the cmd/device-simple folder (look for the device-simple file).
4.3.1.9. Run your Device Service
Allow your newly created Device Service, which was formed out of the Device Service Go SDK, to create sensor-mimicking data that it then sends to EdgeX:
As described in the Getting Started - Users guide, use Docker Compose to start all of EdgeX. From the folder containing the docker-compose file, start EdgeX with the following call:
docker-compose up -d
In a terminal window, change directories to the device-simple’s cmd/device-simple folder. The executable device-simple is located there.

Execute the Device Service with the ./device-simple command, as shown below:
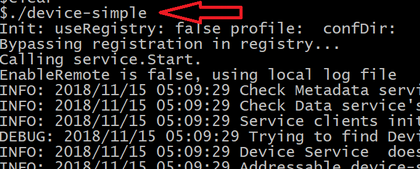
This starts the service and immediately displays log entries in the terminal.
Using a browser, enter the following URL to see the Event/Reading data that the service is generating and sending to EdgeX:
http://localhost:48080/api/v1/event/device/RandNum-Device-01/100

This request asks for the last 100 Events/Readings from Core Data associated to the RandNum-Device-01.
Note: If you are running the other EdgeX services somewhere other than localhost, use that hostname in the above URL.